24.1 PEcAn Virtual Machine
See also other VM related documentation sections:
- Maintaining your PEcAn VM
- Connecting to the VM via SSH
- Connecting to bety on the VM via SSh
- Using Amazon Web Services for a VM (AWS)
- Creating a Virtual Machine
- VM Desktop Conversion
- Install RStudio Desktop
The PEcAn virtual machine consists of all of PEcAn pre-compiled within a Linux operating system and saved in a “virtual machine” (VM). Virtual machines allow for running consistent set-ups without worrying about differences between operating systems, library dependencies, compiling the code, etc.
Install VirtualBox This is the software that runs the virtual machine. You can find the download link and instructions at http://www.virtualbox.org. NOTE: On Windows you may see a warning about Logo testing, it is okay to ignore the warning.
Download the PEcAn VM You can find the download link at http://opensource.ncsa.illinois.edu/projects/artifacts.php?key=PECAN, under the “Files” header. Click the “.ova” file to begin the download. Note that the file is ~7 GB, so this download can take several minutes to hours depending on your connection speed. Also, the VM requires >4 GB of RAM to operate correctly. Please check current usage of RAM and shutdown processes as needed.
Import the VM Once the download is complete, open VirtualBox. In the VirtualBox menus, go to “File” → “Import Appliance” and locate the downloaded “.ova” file.
For Virtualbox version 5.x: In the Appliance Import Settings, make sure you select “Reinitialize the MAC address of all network cards” (picture below). This is not selected by default and can result in networking issues since multiple machines might claim to have the same network MAC Address.

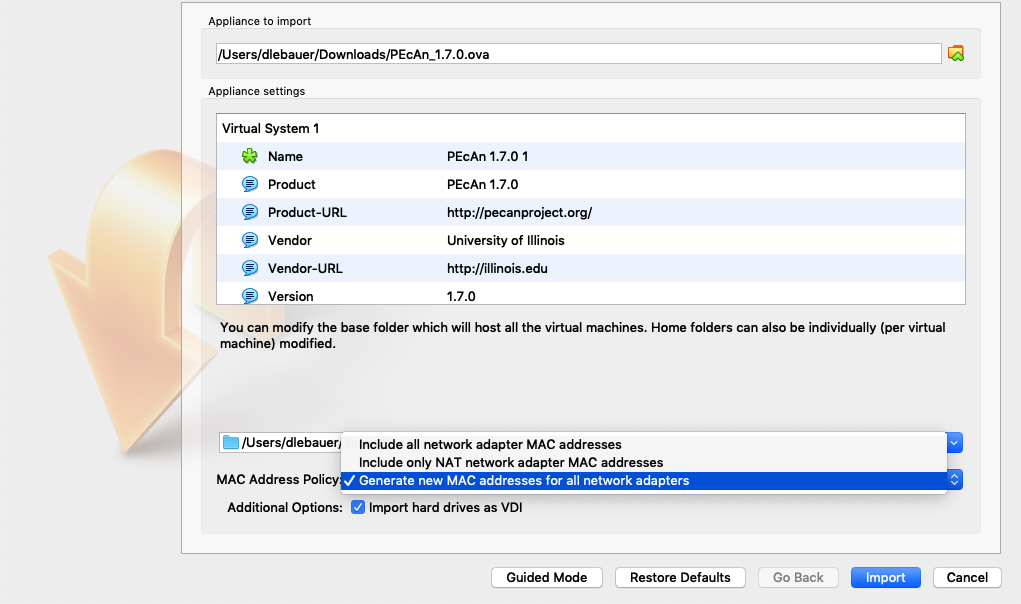
For Virtualbox versions starting with 6.0, there is a slightly different interface (see figure). Select “Generate new MAC addresses for all network adapters” from the MAC Address Policy:

NOTE: If you experience network connection difficulties in the VM with this enabled, try re-importing the VM without this setting selected).
Finally, click “Import” to build the Virtual Machine from its image.
- Launch PEcAn Double click the icon for the PEcAn VM. A terminal window will pop up showing the machine booting up which may take a minute. It is done booting when you get to the
pecan login:prompt. You do not need to login as the VM behaves like a server that we will be accessing through you web browser. Feel free to minimize the VM window.
- If you do want to login to the VM, the credentials are as follows:
username: carya,password: illinois(after the pecan tree, [Carya illinoinensis][pecan-wikipedia]).
- Open the PEcAn web interface With the VM running in the background, open any web browser on the same machine and navigate to
localhost:6480/pecan/to start the PEcAn workflow. (NOTE: The trailing backslash may be necessary depending on your browser)
- To ssh into the VM, open up a terminal on your machine and execute
ssh -l carya -p 6422 localhost. Username and password are the same as when you log into the machine.