4 Entering Meta-Data
Before entering your trait data, you must first add associated metadata into BETYdb.
Each data point should have an associated experiment, site, treatment, and citation. Cultivar information is also required when available.
There are a few methods in which metadata may be entered into BETYdb. Available methods include the BETYdb web interface, BETYdb-YABA and its python client, or SQL. Each method has a different use case.
The web interface can be used when you need to add a few records to each table, while the BETYdb-YABA and its python client should be used when you would like to perform an automated bulk upload to many tables. SQL can also be used for bulk uploads. However, SQL should primarily be used when you need to fix an error with your data, need to remove duplicate records / replace records, or when your metadata addition requires a feature that is not avaiable through the web interface or BETYdb-YABA.
4.1 BETYdb web interface
The following sections provide detailed information on how to add new metadata using the web interface. This video on YouTube walks through the process of annotating a publication, entering metadata, and preparing data for use in the bulk upload interface.
To access the web interface, go to the instance of BETYdb that you are using. The full list of BETYdb web interfaces is in the BETYdb Technical Documentation.
Here is a list of the some of the more commonly used public databases running BETYdb software:
| Institution | URL | contact |
|---|---|---|
| Energy Biosciences Institute | https://betydb.org | kooper@illinois.edu |
| Boston University | https://psql-pecan.bu.edu/bety | dietze@bu.edu |
| Brookhaven National Lab | https://modex.bnl.gov/bety | serbin@bnl.gov |
| University of Wisconsin | http://tree.aos.wisc.edu:6480/bety | desai@aos.wisc.edu |
| TERRA-REF | https://terraref.org/bety | dlebauer@email.arizona.edu |
| University of Arizona | http://welsch.cyverse.org:8000/bety/ | julianp@email.arizona.edu |
You must have creator or manager permissions and be logged in to add new data. Contact the project lead for information and permissions.
4.1.1 Adding a Citation
Citation provides information regarding the source of the data. A PDF copy of each paper should be available through Mendeley.
- Select one of the starred papers from your project's Mendeley folder.
- The data to be entered should be specified in the notes associated with the paper in Mendeley
- Identify (highlight or underline) the data (means and statistics) that you will enter
- Enter citation information
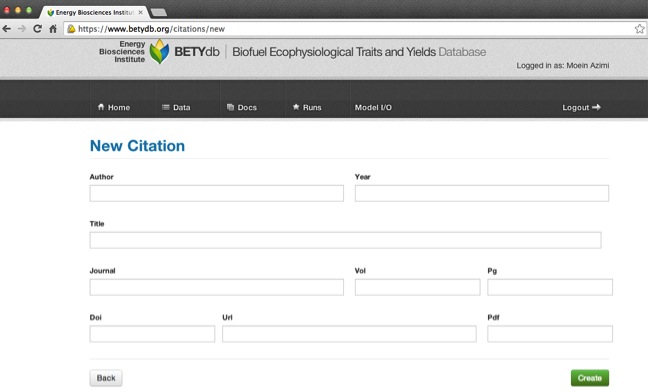
- Data entry form for a new site:
BETYdb→Citations→new - Author: Input the first author’s last name only
- Year: Input the year the paper was published, not submitted, reviewed, or anything else
- Fill out Title, Journal, Vol, & Pg. For unknown information, input 'NA'
- DOI: The 'digital object identifier'. If DOI is available, PDF and URL are optional. This can be located in the article or in the article website. Use Ctrl+F 'DOI' to find it. Some older articles do not have a DOI. When entering the DOI, don't include a "doi:" prefix; the DOI should start with "10.".
- URL: Web address of the article, preferably from publisher's website. Include the
"http://"or"https://"prefix. If no on-line version is available, but some other information about how to obtain the citation is available, you may use a parenthesized note in lieu of a bona fide URL, e.g. "(e-mail Dr. No at no@example.com for a written copy)". - PDF: URL of the PDF of the article. Include the
"http://"or"https://"prefix. (A parenthesized note is allowed here as well.)
- Data entry form for a new site:
4.1.2 Adding a Site
Each experiment is conducted at a unique site. In the context of BETY, the term 'site' refers to a specific location and it is common for many sites to be located within the same experimental station. By creating distinct records for multiple sites, it is possible to differentiate among independent studies.
- Before adding a site, search to make sure that site is not already entered in the database.
- Search for the site given latitude and longitude
- If an institution name or city and state are given, try to locate the site on Google Maps
- If a site name is given, try to locate the site using a combination of Google and Google Maps
- If latitude and longitude are given in the paper, search by lat and lon, which will return all sites within \(\pm\) 1 degree lat and long.
- If an existing site is plausibly the same site as the one mentioned in the paper, it will be necessary to check other papers linked to the existing site.
- Use the same site if the previous study uses the exact same location and experimental setup.
- Create a new site if the study was conducted in a different field (i.e., not the exact same location).
- Create a new site if one study was conducted in a greenhouse and another was conducted in a field.
- Do not use distinct sites for seed source in a common garden experiment (see When not to enter a new site below)
- To use an existing site, click
Editfor the site, and then select current citation underAdd Citation Relationships - If site does not exist, add a new site.
Interface for adding a new site:
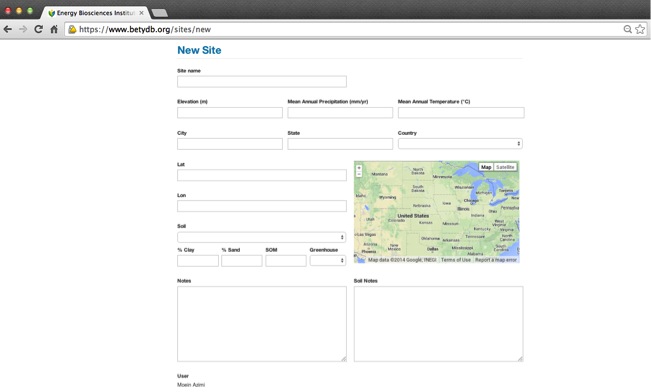
Attributes of a site record
| Descriptors | Notes |
|---|---|
| Site Name | Site identifier, sufficient to uniquely identify the site within the paper |
| City | Nearest city |
| State | State, if in the US |
| Country | Country |
| Longitude | Decimal Form. For conversion see the equation in table 9 |
| Latitude | Decimal Form. For conversion see the equation in table 9 |
| Greenhouse | TRUE if plants were grown in a greenhouse, growth chamber or pots. |
| Soil | By percent clay, sand, and silt if given |
| SOM | Soil organic matter (% by weight) |
| MAT | Mean Annual Temperature (°C) |
| MAP | Mean Annual Percipitation (mm) |
| MASL | Elevation (meters above sea level, m) |
| Notes | Site Details not included above |
| Soil Notes | Soil details not included above |
| Rooting Zone Depth | Measured in Meters (m) |
| Depth of Water Table | Measured in Meters (m) |
4.1.2.1 When not to enter a new site
Do not enter a new site when plants (or seeds) are collected from multiple locations and then grown in the same location; this is called "common garden experiment". In this case, the location of the study is included as site information. Information about the seed source can be entered as a distinct cultivar.
4.1.2.2 Site Location
Points can be added via the web interface; spatial geometries, e.g. a plot, site, or country boundary, must be entered via the PostgreSQL command line.
4.1.2.2.1 Point Locations
If latitude and longitude coordinates are not available, it is often possible to determine the site location based on the site name, city, and other information. One way to do this would be to look up a location name in Google Maps and then locate it on the embedded map. Google Maps can provide decimal degrees if the LatLng feature is enabled, which can be done here. Google Earth can be particularly useful in locating sites, along with their coordinates and elevation. Alternatively, the site website or address might be found through an internet search (e.g. Google).
Use the table below to determine the number of significant digits to indicate the level of precision with which a study location is known.
| Location Detail | Degree Accuracy |
|---|---|
| City | 0.1 |
| Mile | 0.01 |
| Acre | 0.001 |
| 10 Meters | 0.0001 |
4.1.2.2.2 Boundaries
A vector boundary must be obtained. Here is one way to obtain a site boundary using R:
A rectangular plot (with bounding box)
Here I set the bounding box for a plot by specifying the plot corners and elevation. Notice that it is necessary to specify the first point twice, once at the beginning and once at the end.
UPDATE sites
SET geometry = ST_Geomfromtext('POLYGON((-76.116081 42.794448 415,
                                         -76.116679 42.794448 415,
                                         -76.116679 42.79231 415,
                                         -76.116081 42.79231 415,
                                         -76.116081 42.794448 415))', 4326)
WHERE
    ID = 1123;
A country boundary:
library(prevR)# for `create.boundary` function
library(sp)
library(rgeos)

UK_boundary <- create.boundary('United Kingdom')
writeLines(
  paste("insert into sites (country, sitename, geometry) values ('UK', 'United Kingdom', ST_GEOMFromText('",
         writeWKT(UK_boundary), "',4326)) ;"), con = 'uk.sql')
Then import at the command line (can also copy / paste to terminal, but this boundary is long)
psql -U bety -d bety < uk.sql4.1.2.2.3 References
- PostGIS
ST_GeomFromTextdocumentation: http://www.postgis.org/docs/ST_GeomFromText.html - gis.stackexchange: http://gis.stackexchange.com/q/111212/1239
- Github issues: https://github.com/PecanProject/pecan/issues/570
4.1.3 Adding Treatments and Managements
4.1.3.1 Adding a Treatment
Treatments provide a description of a study’s treatments. Any specific information such as rate of fertilizer application should be recorded in the managements table. In general, managements are recorded when Yield data is collected, but not when only Trait data is collected.
When not to use treatment: predictor variables that are not based on distinct managements, or that are distinguished by information already contained in the trait (e.g. site, cultivar, date fields) should not be given distinct treatments. For example, a study that compares two different species, cultivars or genotypes can be assigned the same control treatment; these categories will be distinguished by the species or cultivar field. Another example is when the observation is made at two sites: the site field will include this information.
A treatment name is used as a categorical (rather than continuous) variable: it should be easy to find the treatment in the paper based on the name in the database. The treatment name does not have to indicate the level of treatment used in a particular treatment - this information will be included in the management table.
It is essential that a control group is identified with each study. If there is no experimental manipulation, then there is only one treatment. In this case, the treatment should be named 'observational' and listed as control. To determine the control when it is not explicitly stated, first determine if one of the treatments is most like a background condition or how a system would be in its non-experimental state. In the case of crops, this could be how a farmer would be most likely to treat a crop.
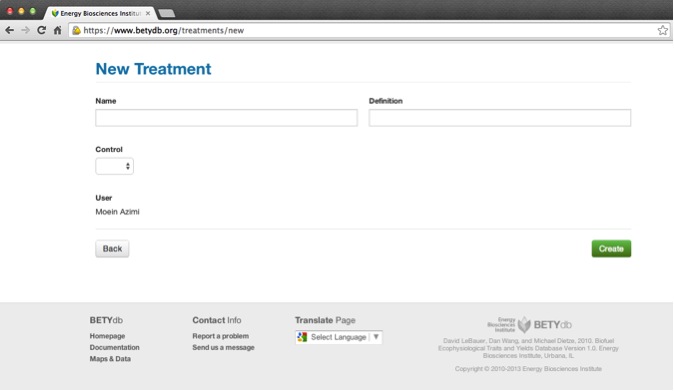
Name: indicates type of treatment; it should be easy for anyone with the original paper to be able to identify the treatment from its name.
Control: make sure to indicate if the treatment is the study 'control' by selecting true or false
Definition: indicates the specifics of the treatment. It is useful for identification purposes to use a quantified description of the treatment even though this information can only be used for analysis when entered as a management.
4.1.3.2 Adding Managements
There are two ways to add management information, through the web interface or from a spreadsheet. These are discussed in turn, below. Recall that managements can be associated with one or more treatments.
Managements refers to something that occurs at a specific time and has a quantity. Managements include actions that are done to a plant or ecosystem, such as the planting density or rate of fertilization, for example. Managements are distinct from treatments in that a treatment is used to categorically identify an experimental treatment, whereas a management is used to describe what has been done. Managements are the way a treatment becomes quantified. Each treatment is often associated with multiple managements. The combination of managements associated with a particular treatment will distinguish it from other treatments. The management types that can be entered into BETY are described in the table below. Each management may be associated with one or more treatments. For example, in a fertilization experiment, planting, irrigation, and herbicide managements would be applied to all plots but the fertilization will be specific to a treatment. For a multi-year experiment, there may be multiple entries for the same type of management, reflecting, for example, repeated applications of herbicide or fertilizer.
Note: Managements are not always required and the level of detail depends on the scope of research. By default managements are recorded for Yields but not for Traits, unless specifically required by the data or project manager.
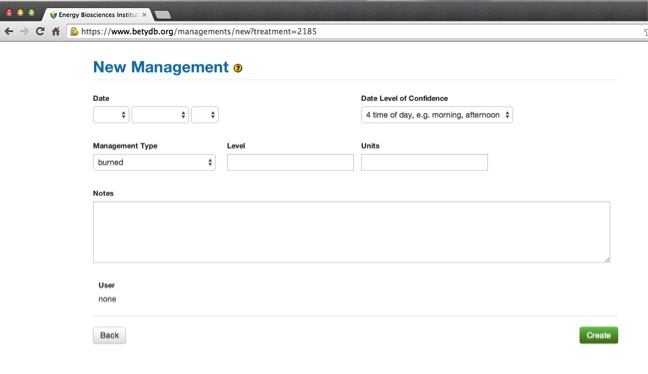
- Date: In format
YYYY-MM-DDorYYYY-MM-DD HH:MM. - Dateloc: Date level of confidence, explained in Section DateLOC and the accompanying table.
- Mgmttype: The name of the management being used. A list of standardized management types can be found in the table below.
- Level: A quantification of mgmttype.
- Units: Refers to the units of the level. Units should be converted to those in following table.
4.1.3.2.1 Types of Managements
The following table shows a list of managements to enter. It is more important to have management records for yields than for traits. For greenhouse experiments, it is not necessary to include informaton on fertilizaton, lighting, or greenhouse temperature.
| Management Type | Units | Definition | Notes |
|---|---|---|---|
| Burned | aboveground biomass burned | ||
| CO2 fumigation | ppm | ||
| Fertilization_X | kg x ha\(^{-1}\) | fertilization rate, element X | |
| Fungicide | kg x ha\(^{-1}\) | add type of fungicide to notes | |
| Grazed | years | livestock grazing | pre-experiment land use |
| Harvest | no units, just date, equivalent to coppice, aboveground biomass removal | ||
| Herbicide | kg x ha\(^{-1}\) | add type of herbicide to notes: glyphosate, atrazine, many others | |
| Irrigation | cm | convert volume area to depth as required | |
| Light | W m\(^{-2}\) | ||
| O3 fumigation | ppm | ||
| Pesticide | kg x ha\(^{-1}\) | add type of pesticide to notes | |
| Planting | plants m\(^{-2}\) | Convert row spacing to planting density if possible | |
| Seeding | kg seeds x ha\(^{-1}\) | ||
| Tillage | no units, maybe depth; tillage is equivalent to cultivate |
4.1.3.2.2 Via Web interface
Managements can be entered via the web interface. First enter the management, and then associate it with one or more treatments. To associate a management with multiple treatments, first create the management, then edit the management and add treatment relationships.
4.1.3.2.3 Preparing a managements spreadsheet for Upload
When there is a long list of managements, the insert_managements scripts enables users to insert data organized in a text based (csv) file.
Preparing the csv file can be done in any spreadsheet program such as Excel or Google Sheets. The insertion is straightforward, but requires familiarity with the bash shell as well as administrative access to the Postgres database.
File format
Required Fields the spreadsheet or CSV file must contain the following column headings:
citation_author
citation_title
citation_year
treatment_name
mgmttype
These columns map to fields in the database (in the citations, treatments, and managements field). Each row must have non-empty values in each of these columns. Moreover, the citation columns must match exactly one row in the citations row of the database and the treatment name must match exactly one of the treatment rows associated with the matched citation.
Optional Fields The table may also contain the following column headings:
date
dateloc
level
units
notes
Each optional column heading corresponds to an optional field in the database managements table. The column can contain one or more empty rows.
If the table is prepared in a spreadsheet program, use the "save as → .csv" option to export a single text based .csv file.
4.1.3.2.4 Inserting Management Insertion Script
The insert_managements.rb script takes a CSV file describing managements to be added to the database as input and outputs a file containing SQL statements to do the required insertions.
The script insert_managements.rb is in the directory RAILS_ROOT/script. The complete usage instructions (also obtainable by running ./insert_managements --man) follow. For additional information, see Github issue #288.
insert_managements.rb
Usage:
       insert_managements [options] <CSV input file>
where [options] are:
  -u, --login=<s>          The Rails login for the user running the script
                           (required)
  -o, --output=<s>         Output file (default: new_managements.sql)
  -e, --environment=<s>    Rails environment to run in (default: development)
  -m, --man                Show complete usage instructions
  -h, --help               Show this message
Database Specification
The database used by the script is determined by the environment specified by the '--environment' option (or 'development' if not specified) and the contents of the configuration file 'config/database.yml'.
(Run 'rake dbconf' to view the contents of this file on the command line.)
Using the Script to Update the Production Database
There are three options for using this script to update the production database.
Option A: Run the script on the production server in the Rails root directory of the production deployment of the BETYdb Rails app.
Upload the input CSV file to the production machine.
Log in to the production machine and cd to the root directory of production deployment of the BETYdb Rails app.
Run the script using the '--environment=production' option and with '--login' set to your own BETYdb Rails login for the production deployment. The command-line argument specifying the input CSV file path should match the location you uploaded it to.
After examining the resulting output file, apply it to the database with the command
psql <production database name> < <output file name>
(If your machine login doesn't match a PostgreSQL user name that has insert permissions on the production database, you will have to use the '-U' option to specify a user who does have such permission.)
Option B: Run the script on your local machine using an up-to-date copy of the BETYdb database.
To do this:
Switch to the root of the copy of the BETYdb Rails app you want to use.
For the copy of the BETYdb database connected to this copy of the Rails app, ensure that at least the citations and the treatments tables are up-to-date with the production copy of the BETYdb database. (If you have different databases specified for your development and your production environments, be sure that the environment you specify with the '--environment' option points to the right database.)
Run this script.
Upload the output file to the production server and apply it to the production database using the psql command given above.
Option C: Run the script on your local machine using a Rails environment connected to the production database.
- Go to the copy of the BETYdb Rail app on your local machine that you wish to use.
Edit the file config/database.yml, adding the following section:
Most of these values can be copied from the production copyebi: adapter: postgis encoding: utf8 reconnect: false database: <production database name> pool: 5 username: <user name for connecting to the production database> password: <password for the user specified above> port: 8000 host: localhostconfig/database.ymlif you have access to it. The port and host entries are 'new'.Set up an ssh tunnel to the production server using the command
ssh -L 8000:<production server address>:5432 <production server address>This will log you into the production server, but at the same time it will connect port 8000 on your local machine with port 5432 (the PostgreSQL server port) on the production machine. (The choice of 8000 for port number is somewhat arbitrary, but whatever value you use should match the value you specified for the port number in the database.yml file.)
- Run this script with the environment option '--environment=ebi'. (Again, the name 'ebi' for the environment is somewhat arbitrary, but the option value should match the name in your database.yml file.)
Continue as in step 4 under option B.
4.1.4 Adding a PFT, Species, or Cultivar
Plant functional types (PFTs) are used to group plants for statistical modeling and analysis. PFTs are associated with both a specific set of priors, and a subset species for which the traits and yields data will be queried. In many cases, it is appropriate to use default PFTs (e.g. tempdecid is temperate deciduous trees)
In other cases, it is necessary to define PFTs for a specific project. For example, to query a specific set of priors or a subset of a species, a new PFT may be defined. For example, Xiaohui Feng defined PFTs for the species found at the EBI Farm prairie. Such project-specific PFTs can be defined as `projectname`.`pft` (i.e. ebifarm.c4grass instead of c4grass).
Species that are found or cultivated in the United States should be in the Plants table. Look it up there first.
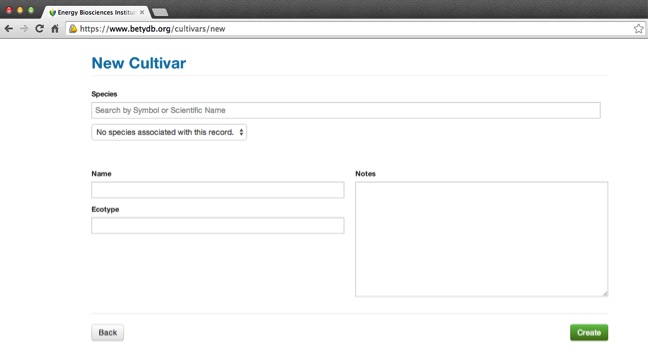
To add a new Cultivar, go to the new cultivar page: Cultivar → new.
4.2 BETYdb-YABA and Python Client Library
BETYdb-YABA and its python client library provides an automated bulk upload to many BETYdb tables. API endpoints have been implemented to upload data to respective tables. For more information including examples for all endpoints and a link to the Swagger documentation, see the BETYdb-YABA README.
Here are some examples of how to hit Experiments and Sites endpoints:
Experiments:
curl -F "fileName=@input_files/experiments.csv"   \
     http://localhost:5001/yaba/v1/experiments?username=guestuser
Sites:
curl -F "fileName=@input_files/sites.csv"   \
     -F "shp_file=@input_files/S8_two_row_polys.shp"  \
     -F "dbf_file=@input_files/S8_two_row_polys.dbf"  \
     -F "prj_file=@input_files/S8_two_row_polys.prj"  \
     -F "shx_file=@input_files/S8_two_row_polys.shx"  \
     http://localhost:5001/yaba/v1/sites
4.3 SQL
SQL should be used only when the data manipulation to be done either can't be done using the web interface or where doing so would be exceedingly tedious. For example, some of the steps below can't be done in either the web interface, and the BETYdb-YABA API is not always available.
SQL should primarily be used in the following cases:
- correcting systemic data errors involving large numbers of rows
- assigning non-point geometries to sites
- associating experiments with sites and treatments
- associating sites with cultivars
4.3.1 Metadata Entry Workflow for BETYdb
The following steps have been implemented in the BETYdb-YABA API and python client, but are described below for reference
Here we show SQL code used to add metadata required each season by the TERRA REF database, including experiments, sites, treatments, cultivars, and citations that is required prior to uploading the trait or yield data. Most PEcAn users will not need to add experiments and cultivars, or associate these records with sites.
Also note that in the TERRA REF and other agronomic applications, each record in the 'sites' table will correspond to an experimental plot.
4.3.2 Step 1: Add new experiments
insert into experiments (name, start_date, end_date, user_id)
values ('MAC Season 6: Sorghum BAP', '2018-04-06', '2018-08-01', 'some text', 'some text', 6000000004);
4.3.3 Step 2: Add new sites
To add sites (or many plots at a single site) using the BETYdb-YABA API, you must provide shapefile for a site to have an associated geometry.
Otherwise, you can add sites with points or polygons to the database as follows.
insert into sites (city, state, country, sitename)
values ('Maricopa', 'Arizona', 'USA', 'MAC Field Scanner Season 7 Range 9 Column 15');
You can add simple locations with a single point thus:
```sql insert into sites (city, state, country, sitename, geometry) values ('Urbana', 'Illinois', 'United States', 'My garden plot', ST_SetSRID(ST_makePoint(88, 40, 222), 4326)); For the TERRA REF Project, plot definitions may be copied from previous season if same plots are used.
with season6 as (
  select city, state, replace(sitename, 'Season 4', 'Season 6') as sitename, greenhouse, geometry, time_zone from sites where sitename like '%Season 4%'
)
insert into sites (city, state, sitename, greenhouse, geometry, time_zone) select * from season6;
4.3.4 Step 3: Add new treatments
insert into treatments (name, definition, control)
values ('MAC Season 6: Sorghum', 'some text', 't');
4.3.5 Step 4: Add new cultivars
Each cultivar must be associated with a species. If there is no entry for the species in the species table, it must be added before adding the new cultivar.
insert into cultivars (name, specie_id)
values ('RIL-CS27_(TX2910/(Macia/R07007)-CS44)-CSF1-PRF2-CS27', 2588);
4.3.6 Step 5: Add new citations
insert into citations (author, year, title)
values ('Newcomb, Maria', 2016, 'Maricopa Agricultural Center Field Activities');
4.3.7 Step 6: Associate experiments with sites
As an example, this statement could be used to associate the experiment named "MAC Season 6: Sorghum BAP" with the site named "MAC Field Scanner Season 6 Range 1 Column 1 E".
insert into experiments_sites (experiment_id, site_id) values
  ((select id from experiments where name = 'MAC Season 6: Sorghum BAP'),
  (select id from sites where sitename = 'MAC Field Scanner Season 6 Range 1 Column 1 E'));
When adding a new season for the TERRA REF project, a statement like the following can be used for associating the new season's experiment [or "an experiment for the new season"] with all of the new season's sites. For example, since MAC Field Center sites are consistently named following the format MAC Field Scanner Season x Range a Column b, we could use the following statement to associate the experment named "MAC Season 6: Sorghum BAP" with all Season 6 sites:
insert into experiments_sites (experiment_id, site_id)
   select e.experiment_id, s.site_id
        from (select id as experiment_id from experiments where name = 'MAC Season 6: Sorghum BAP')  as e
     cross join
         (select id as site_id from sites where sitename like 'MAC Field Scanner Season 6%') as s;
4.3.8 Step 7: Associate experiments with treatments
insert into experiments_treatments (experiment_id, treatment_id)
values ((select id from experiments where name = 'MAC Season 6: Sorghum BAP'),
(select id from treatments where name = 'MAC Season 6: Sorghum'));
When adding a new season for the TERRA REF project, a statement like the following can be used to associate all season 6 experiments with all season 6 treatments assuming the experiment and treatment names follow the format convention MAC Season x: subexperiment name.
insert into experiments_treatments (experiment_id, treatment_id)
   select e.experiment_id, t.treatment_id
        from (select id as experiment_id from experiments where name like 'MAC Season 6:%')  as e
     cross join
         (select id as treatment_id from treatments where name like 'MAC Season 6:%') as s;
4.3.9 Step 8: Associate sites with cultivars
As an example, this statement could be used to associate the site name MAC Field Scanner Season 8 Range 1 Column 1 E with the Sorghum bicolor cultivar Tiburon:
insert into sites_cultivars (site_id, cultivar_id)
    values ((select id from sites where sitename = 'MAC Field Scanner Season 8 Range 1 Column 1 E'),
            (select id from cultivars where name = 'Tiburon' and specie_id =
            (select id from species where scientificname = 'Sorghum bicolor')));
4.3.10 Step 9: Associate sites with citations
insert into citations_sites (citation_id, site_id)
values ((select id from citations where author = 'Newcomb, Maria' and year = 2016 and title = 'MAC Field Activities'),
(select id from sites where sitename = 'MAC Field Scanner Season 6 Range 1 Column 1 E'));
When adding a new season for the TERRA REF project, a statement like the following can be used to associate all citations with author "Newcomb, Maria" with all Season 6 sites since MAC Field Center sites are consistently named following the format MAC Field Scanner Season x Range a Column b
insert into citations_sites (citation_id, site_id)
   select c.id, s.id
      from (select id from citations where author = 'Newcomb, Maria')
     AS c
      cross join
         (select id from sites where sitename like 'MAC Field Scanner Season 6%') AS s;
4.4 Removing duplicate records
It sometimes happens that multiple rows in a BETYdb table are duplicates, e.g., two species or two sites that were independently added but reference the same entity. A function such as the one that follows could be used to delete a duplicate row and change all references to it to point to a row that we are retaining. (Note that there are serious problems associated with the use of this function, as outlined in this comment in issue 185. We present it here only to outline what might be possible along the lines of partially automating the correction of data errors.)
The function takes three arguments: the name of the table we wish to update (as a string), the id number of the row we wish to remove (the "duplicate"), and the id number of the similar row we wish to retain. For example, if we have two citation rows having essentially the same information having id numbers 286 and 289, we could remove the first and update references to it to point to the second with the statement
SELECT update_refs_from_to('citations', 286, 289);The following function can be used to combine duplicates or replace an old record with a new one. There are many caveats described in Issue 185.
But the basic usage, e.g. to convert all records with citation_id = 286 to citation_id = 289:
SELECT update_refs_from_to('citations', 286, 289);To make the function available, first run this code:
CREATE OR REPLACE FUNCTION update_refs_from_to(
  primary_table_name varchar,
  old_id bigint,
  new_id bigint
) RETURNS void AS $$
DECLARE
  foreign_key_col_name varchar;
  referring_table_name varchar;
  update_stmt varchar;
  delete_stmt varchar;
BEGIN
  foreign_key_col_name := regexp_replace(primary_table_name, 's$', '') || '_id';
  FOR referring_table_name IN SELECT table_name FROM information_schema.columns WHERE table_schema = 'public' AND "column_name" = foreign_key_col_name AND is_updatable = 'YES' LOOP

    BEGIN
      update_stmt := 'UPDATE ' || referring_table_name || ' SET ' || foreign_key_col_name || ' = ' || new_id || ' WHERE ' || foreign_key_col_name || ' = ' || old_id;
      RAISE NOTICE 'Attempting to run %', update_stmt;
      EXECUTE update_stmt;
      RAISE NOTICE 'Success!';
    EXCEPTION
      WHEN unique_violation THEN
        RAISE NOTICE 'UPDATE FAILED!!!';
        RAISE NOTICE 'Updating table column % in table % would violate uniqueness constraints', foreign_key_col_name, referring_table_name;
    END;
  END LOOP;
  BEGIN
    delete_stmt := 'DELETE FROM ' || primary_table_name || ' WHERE id = ' || old_id;
      RAISE NOTICE 'Attempting to run %', delete_stmt;
      EXECUTE delete_stmt;
      RAISE NOTICE 'Success!';
  EXCEPTION
    WHEN foreign_key_violation THEN
      RAISE NOTICE 'DELETION FAILED!!!';
      RAISE NOTICE 'Deletion from table % of the row with id % would cause a foreign-key violation', primary_table_name, old_id;
  END;
END
$$ LANGUAGE plpgsql;