21 Workflow modules
NOTE: As of PEcAn 1.2.6 – needs to be updated significantly
21.0.1 Overview
Workflow inputs and outputs (click to open in new page, then zoom). Code used to generate this image is provided in qaqc/vignettes/module_output.Rmd

21.0.2 Load Settings:
21.0.2.1 read.settings("/home/pecan/pecan.xml")
- loads settings
- create directories
- generates new xml, put in output folder
21.0.3 Query Database:
21.0.3.1 get.trait.data()
Queries the database for both the trait data and prior distributions associated with the PFTs specified in the settings file. The list of variables that are queried is determined by what variables have priors associated with them in the definition of the pft. Likewise, the list of species that are associated with a PFT determines what subset of data is extracted out of all data matching a given variable name.
21.0.4 Meta Analysis:
21.0.4.1 run.meta.analysis()
The meta-analysis code begins by distilling the trait.data to just the values needed for the meta-analysis statistical model, with this being stored in madata.Rdata. This reduced form includes the conversion of all error statistics into precision (1/variance), and the indexing of sites, treatments, and greenhouse. In reality, the core meta-analysis code can be run independent of the trait database as long as input data is correctly formatted into the form shown in madata.
The evaluation of the meta-analysis is done using a Bayesian statistical software package called JAGS that is called by the R code. For each trait, the R code will generate a [trait].model.bug file that is the JAGS code for the meta-analysis itself. This code is generated on the fly, with PEcAn adding or subtracting the site, treatment, and greenhouse terms depending upon the presence of these effects in the data itself.
Meta-analyses are run, and summary plots are produced.
21.0.5 Write Configuration Files
21.0.5.1 write.configs(model)
- writes out a configuration file for each model run
** writes 500 configuration files for a 500 member ensemble
** for n traits, writes
6 * n + 1files for running default Sensitivity Analysis (number can be changed in the pecan settings file)
21.0.6 Start Runs:
21.0.6.1 start.runs(model)
This code starts the model runs using a model specific run function named start.runs.model. If the ecosystem model is running on a remote server, this module also takes care of all of the communication with the remote server and its run queue. Each of your subdirectories should now have a [run.id].out file in it. One instance of the model is run for each configuration file generated by the previous write configs module.
21.0.7 Get Model Output
21.0.7.1 get.model.output(model)
This code first uses a model-specific model2netcdf.model function to convert the model output into a standard output format (MsTMIP). Then it extracts the data for requested variables specified in the settings file as settings$ensemble$variable, averages over the time-period specified as start.date and end.date, and stores the output in a file output.Rdata. The output.Rdata file contains two objects, sensitivity.output and ensemble.output, that is the model prediction for the parameter sets specified in sa.samples and ensemble.samples. In order to save bandwidth, if the model output is stored on a remote system PEcAn will perform these operations on the remote host and only return the output.Rdata object.
21.0.8 Ensemble Analysis
21.0.8.1 run.ensemble.analysis()
This module makes some simple graphs of the ensemble output. Open ensemble.analysis.pdf to view the ensemble prediction as both a histogram and a boxplot. ensemble.ts.pdf provides a timeseries plot of the ensemble mean, meadian, and 95% CI
21.0.9 Sensitivity Analysis, Variance Decomposition
21.0.9.1 run.sensitivity.analysis()
This function processes the output of the previous module into sensitivity analysis plots, sensitivityanalysis.pdf, and a variance decomposition plot, variancedecomposition.pdf . In the sensitivity plots you will see the parameter values on the x-axis, the model output on the Y, with the dots being the model evaluations and the line being the spline fit.
The variance decomposition plot is discussed more below. For your reference, the R list object, sensitivity.results, stored in sensitivity.results.Rdata, contains all the components of the variance decomposition table, as well as the the input parameter space and splines from the sensitivity analysis (reminder: the output parameter space from the sensitivity analysis was in outputs.R).
The variance decomposition plot contains three columns, the coefficient of variation (normalized posterior variance), the elasticity (normalized sensitivity), and the partial standard deviation of each model parameter. This graph is sorted by the variable explaining the largest amount of variability in the model output (right hand column). From this graph identify the top-tier parameters that you would target for future constraint.
21.0.10 Glossary
- Inputs: data sets that are used, and file paths leading to them
- Parameters: e.g. info set in settings file
- Outputs: data sets that are dropped, and the file paths leading to them
21.1 PEcAn Virtual Machine
This section includes the following VM related documentation:
- Maintaining your PEcAn VM
- Connecting to the VM via SSH
- Connecting to bety on the VM via SSh
- Using Amazon Web Services for a VM (AWS)
- Creating a Virtual Machine
- VM Desktop Conversion
- Install RStudio Desktop
The PEcAn virtual machine consists of all of PEcAn pre-compiled within a Linux operating system and saved in a “virtual machine” (VM). Virtual machines allow for running consistent set-ups without worrying about differences between operating systems, library dependencies, compiling the code, etc.
Install VirtualBox This is the software that runs the virtual machine. You can find the download link and instructions at http://www.virtualbox.org. NOTE: On Windows you may see a warning about Logo testing, it is okay to ignore the warning.
Download the PEcAn VM You can find the download link at http://opensource.ncsa.illinois.edu/projects/artifacts.php?key=PECAN, under the “Files” header. Click the “.ova” file to begin the download. Note that the file is ~7 GB, so this download can take several minutes to hours depending on your connection speed. Also, the VM requires >4 GB of RAM to operate correctly. Please check current usage of RAM and shutdown processes as needed.
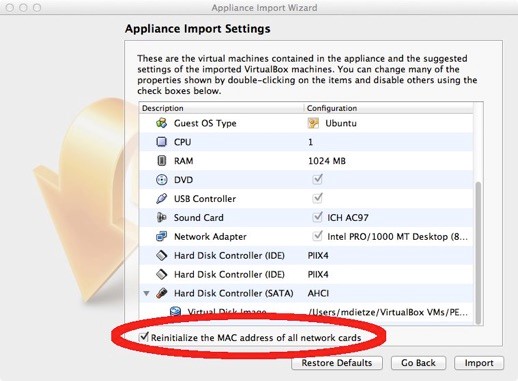
Import the VM Once the download is complete, open VirtualBox. In the VirtualBox menus, go to “File” → “Import Appliance” and locate the downloaded “.ova” file.
For Virtualbox version 5.x: In the Appliance Import Settings, make sure you select “Reinitialize the MAC address of all network cards” (picture below). This is not selected by default and can result in networking issues since multiple machines might claim to have the same network MAC Address.
For Virtualbox versions starting with 6.0, there is a slightly different interface (see figure). Select “Generate new MAC addresses for all network adapters” from the MAC Address Policy:
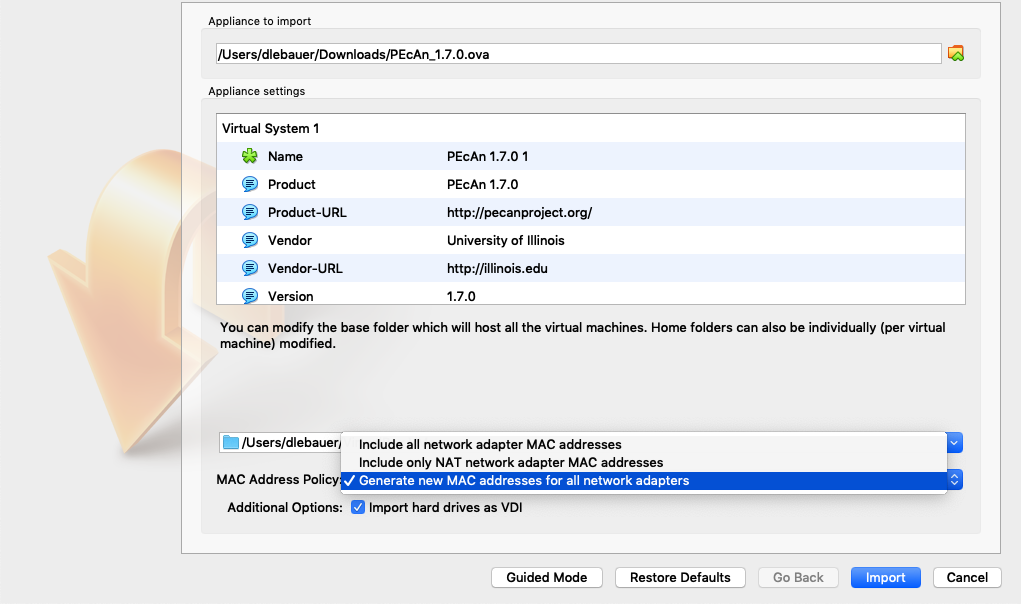
NOTE: If you experience network connection difficulties in the VM with this enabled, try re-importing the VM without this setting selected).
Finally, click “Import” to build the Virtual Machine from its image.
- Launch PEcAn Double click the icon for the PEcAn VM. A terminal window will pop up showing the machine booting up which may take a minute. It is done booting when you get to the
pecan login:prompt. You do not need to login as the VM behaves like a server that we will be accessing through you web browser. Feel free to minimize the VM window.
- If you do want to login to the VM, the credentials are as follows:
username: carya,password: illinois(after the pecan tree, [Carya illinoinensis][pecan-wikipedia]).
- Open the PEcAn web interface With the VM running in the background, open any web browser on the same machine and navigate to
localhost:6480/pecan/to start the PEcAn workflow. (NOTE: The trailing backslash may be necessary depending on your browser)
- To ssh into the VM, open up a terminal on your machine and execute
ssh -l carya -p 6422 localhost. Username and password are the same as when you log into the machine.
21.1.1 AWS Setup
***********Mirror of earlier section in installation section?*********************
21.1.2 Porting VM to AWS
The following are Mike’s rough notes from a first attempt to port the PEcAn VM to the AWS. This was done on a Mac
These notes are based on following the instructions here
21.1.2.1 Convert PEcAn VM
AWS allows upload of files as VMDK but the default PEcAn VM is in OVA format
If you haven’t done so already, download the PEcAn VM
Split the OVA file into OVF and VMDK files
tar xf <ovafile>21.1.2.2 Set up an account on AWS
After you have an account you need to set up a user and save your access key and secret key
In my case I created a user named ‘carya’
Note: the key that ended up working had to be made at https://console.aws.amazon.com/iam/home#security_credential, not the link above.
21.1.2.3 Install EC2 command line tools
wget http://s3.amazonaws.com/ec2-downloads/ec2-api-tools.zip

sudo mkdir /usr/local/ec2

sudo unzip ec2-api-tools.zip -d /usr/local/ec2
If need be, download and install JDK
export JAVA_HOME=$(/usr/libexec/java_home)

export EC2_HOME=/usr/local/ec2/ec2-api-tools-<version>

export PATH=$PATH:$EC2_HOME/bin
Then set your user credentials as environment variables:
export AWS_ACCESS_KEY=xxxxxxxxxxxxxx
export AWS_SECRET_KEY=xxxxxxxxxxxxxxxxxxxxxx
Note: you may want to add all the variables set in the above EXPORT commands above into your .bashrc or equivalent.
21.1.2.4 Create an AWS S3 ‘bucket’ to upload VM to
Go to https://console.aws.amazon.com/s3 and click “Create Bucket”
In my case I named the bucket ‘pecan’
21.1.2.5 Upload
In the code below, make sure to change the PEcAn version, the name of the bucket, and the name of the region. Make sure that the PEcAn version matches the one you downloaded.
Also, you may want to choose a considerably larger instance type. The one chosen below is that corresponding to the AWS Free Tier
ec2-import-instance PEcAn_1.2.6-disk1.vmdk --instance-type t2.micro --format VMDK --architecture x86_64 --platform Linux --bucket pecan --region us-east-1 --owner-akid $AWS_ACCESS_KEY --owner-sak $AWS_SECRET_KEYMake sure to note the ID of the image since you’ll need it to check the VM status. Once the image is uploaded it will take a while (typically about an hour) for Amazon to convert the image to one it can run. You can check on this progress by running
ec2-describe-conversion-tasks <image.ID>21.1.2.6 Configuring the VM
On the EC2 management webpage, https://console.aws.amazon.com/ec2, if you select Instances on the left hand side (LHS) you should be able to see your new PEcAn image as an option under Launch Instance.
Before launching, you will want to update the firewall to open up additional ports that PEcAn needs – specifically port 80 for the webpage. Port 22 (ssh/sftp) should be open by default. Under “Security Groups” select “Inbound” then “Edit” and then add “HTTP”.
Select “Elastic IPs” on the LHS, and “Allocate New Address” in order to create a public IP for your VM.
Next, select “Network Interfaces” on the LHS and then under Actions select “Associate Addresses” then choose the Elastic IP you just created.
See also http://docs.aws.amazon.com/AmazonVPC/latest/GettingStartedGuide/GetStarted.html
21.1.3 Set up multiple instances (optional)
For info on setting up multiple instances with load balancing see: http://docs.aws.amazon.com/ElasticLoadBalancing/latest/DeveloperGuide/gs-ec2VPC.html
Select “Load Balancers” on the LHS, click on “Create Load Balancer”, follow Wizard keeping defaults.
To be able to launch multiple VMs: Under “Instances” convert VM to an Image. When done, select Launch, enable multiple instances, and associate with the previous security group. Once running, go back to “Load Balancers” and add the instances to the load balancer. Each instance can be accessed individually by it’s own public IP, but external users should access the system more generally via the Load Balancers DNS.
21.1.3.1 Booting the VM
Return to “Instances” using the menu on the LHS.
To boot the VM select “Actions” then “Instance State” then “Start”. In the future, once you have the VM loaded and configured this last step is the only one you will need to repeat to turn your VM on and off.
The menu provided should specify the Public IP where the VM has launched
21.2 Shiny Setup
Installing and configuring Shiny for PEcAn authors - Alexey Shiklomanov - Rob Kooper
NOTE: Instructions are only tested for CentOS 6.5 and Ubuntu 16.04 NOTE: Pretty much every step here requires root access.
21.2.1 Install the Shiny R package and Shiny server
Follow the instructions on the Shiny download page for the operating system you are using.
21.2.2 Modify the shiny configuration file
The Shiny configuration file is located in /etc/shiny-server/shiny-server.conf. Comment out the entire file and add the following, replacing <username> with your user name and <location> with the URL location you want for your app. This will allow you to run Shiny apps from your web browser at https://your.server.edu/shiny/your-location
run as shiny;
server {
    listen 3838;
    location /<location>/ {
        run as <username>;
        site_dir /path/to/your/shiny/app;
        log_dir /var/log/shiny-server;
        directory_index on;
    }
}
For example, my configuration on the old test-pecan looks like this.
run as shiny;
server {
    listen 3838;
    location /ashiklom/ {
        run as ashiklom;
        site_dir /home/ashiklom/fs-data/pecan/shiny/;
        log_dir /var/log/shiny-server;
        directory_index on;
    }
}
…and I can access my Shiny apps at, for instance, https://test-pecan.bu.edu/shiny/ashiklom/workflowPlots.
You can add as many location <loc> { ... } fields as you would like.
run as shiny;
server {
    listen 3838;
    location /ashiklom/ {
        ...
    }
    location /bety/ {
        ...
    }
}
If you change the configuration, for example to add a new location, you will need to restart Shiny server. If you are setting up a new instance of Shiny, skip this step and continue with the guide, since there are a few more steps to get Shiny working. If there is an instance of Shiny already running, you can restart it with:
## On CentOS
sudo service shiny-server stop
sudo service shiny-server start

## On Ubuntu
sudo systemctl stop shiny-server.service
sudo systemctl start shiny-server.service
21.2.3 Set the Apache proxy
Create a file with the following name, based on the version of the operating system you are using:
- Ubuntu 16.04 (pecan1, pecan2, test-pecan) –
/etc/apache2/conf-available/shiny.conf - CentOS 6.5 (psql-pecan) –
/etc/httpd/conf.d/shiny.conf
Into this file, add the following:
ProxyPass           /shiny/ http://localhost:3838/
ProxyPassReverse    /shiny/ http://localhost:3838/
RedirectMatch permanent ^/shiny$ /shiny/
21.2.3.1 Ubuntu only: Enable the new shiny configuration
sudo a2enconf shinyThis will create a symbolic link to the newly created shiny.conf file inside the /etc/apache2/conf-enabled directory.
You can do ls -l /etc/apache2/conf-enabled to confirm that this worked.
21.2.4 Enable and start the shiny server, and restart apache
21.2.4.1 On CentOS
sudo ln -s /opt/shiny-server/config/init.d/redhat/shiny-server /etc/init.d
sudo service shiny-server stop
sudo service shiny-server start
sudo service httpd restart
You can check that Shiny is running with service shiny-server status.
21.2.4.2 On Ubuntu
Enable the Shiny server service. This will make sure Shiny runs automatically on startup.
sudo systemctl enable shiny-server.serviceRestart Apache.
sudo apachectl restartStart the Shiny server.
sudo systemctl start shiny-server.serviceIf there are problems, you can stop the shiny-server.service with…
sudo systemctl stop shiny-server.service…and then use start again to restart it.
21.2.5 Troubleshooting
Refer to the log files for shiny (/var/log/shiny-server.log) and httpd (on CentOS, /var/log/httpd/error-log; on Ubuntu, /var/log/apache2/error-log).
21.2.6 Further reading
21.2.7 Thredds Setup
Installing and configuring Thredds for PEcAn authors - Rob Kooper
NOTE: Instructions are only tested for Ubuntu 16.04 on the VM, if you have instructions for CENTOS/RedHat please update this documentation NOTE: Pretty much every step here requires root access.
21.2.8 Install the Tomcat 8 and Thredds webapp
The Tomcat 8 server can be installed from the default Ubuntu repositories. The thredds webapp will be downloaded and installed from unidata.
21.2.8.1 Ubuntu
First step is to install Tomcat 8 and configure it. The flag -Dtds.content.root.path should point to the location of where the thredds folder is located. This needs to be writeable by the user for tomcat. -Djava.security.egd is a special flag to use a different random number generator for tomcat. The default would take to long to generate a random number.
apt-get -y install tomcat8 openjdk-8-jdk
echo JAVA_OPTS=\"-Dtds.content.root.path=/home/carya \${JAVA_OPTS}\" >> /etc/default/tomcat8
echo JAVA_OPTS=\"-Djava.security.egd=file:/dev/./urandom \${JAVA_OPTS}\" >> /etc/default/tomcat8
service tomcat8 restart
Next is to install the webapp.
mkdir /home/carya/thredds
chmod 777 /home/carya/thredds

wget -O /var/lib/tomcat8/webapps/thredds.war ftp://ftp.unidata.ucar.edu/pub/thredds/4.6/current/thredds.war
Finally we configure Apache to prox the thredds server
cat > /etc/apache2/conf-available/thredds.conf << EOF
ProxyPass        /thredds/ http://localhost:8080/thredds/
ProxyPassReverse /thredds/ http://localhost:8080/thredds/
RedirectMatch permanent ^/thredds$ /thredds/
EOF
a2enmod proxy_http
a2enconf thredds
service apache2 reload
21.2.8.2 Customize the Thredds server
To customize the thredds server for your installation edit the file in /home/carya/thredds/threddsConfig.xml. For example the following file is included in the VM.
<?xml version="1.0" encoding="UTF-8"?>
<threddsConfig>

  <!-- all options are commented out in standard install - meaning use default values -->
  <!-- see http://www.unidata.ucar.edu/software/thredds/current/tds/reference/ThreddsConfigXMLFile.html -->
  <serverInformation>
    <name>PEcAn</name>
    <logoUrl>/pecan/images/pecan_small.jpg</logoUrl>
    <logoAltText>PEcAn</logoAltText>

    <abstract>Scientific Data</abstract>
    <keywords>meteorology, atmosphere, climate, ocean, earth science</keywords>

    <contact>
      <name>Rob Kooper</name>
      <organization>NCSA</organization>
      <email>kooper@illinois.edu</email>
      <!--phone></phone-->
    </contact>
    <hostInstitution>
      <name>PEcAn</name>
      <webSite>http://www.pecanproject.org/</webSite>
      <logoUrl>/pecan/images/pecan_small.jpg</logoUrl>
      <logoAltText>PEcAn Project</logoAltText>
    </hostInstitution>
  </serverInformation>

  <!--
  The <catalogRoot> element:
  For catalogs you don't want visible from the /thredds/catalog.xml chain
  of catalogs, you can use catalogRoot elements. Each catalog root config
  catalog is crawled and used in configuring the TDS.

  <catalogRoot>myExtraCatalog.xml</catalogRoot>
  <catalogRoot>myOtherExtraCatalog.xml</catalogRoot>
  -->

  <!--
   * Setup for generated HTML pages.
   *
   * NOTE: URLs may be absolute or relative, relative URLs must be relative
   * to the webapp URL, i.e., http://server:port/thredds/.
    -->
  <htmlSetup>
    <!--
     * CSS documents used in generated HTML pages.
     * The CSS document given in the "catalogCssUrl" element is used for all pages
     * that are HTML catalog views. The CSS document given in the "standardCssUrl"
     * element is used in all other generated HTML pages.
     * -->
    <standardCssUrl>tds.css</standardCssUrl>
    <catalogCssUrl>tdsCat.css</catalogCssUrl>
    <openDapCssUrl>tdsDap.css</openDapCssUrl>

    <!--
     * The Google Analytics Tracking code you would like to use for the
     * webpages associated with THREDDS. This will not track WMS or DAP
     * requests for data, only browsing the catalog.
    -->
    <googleTrackingCode></googleTrackingCode>

  </htmlSetup>

  <!--
    The <TdsUpdateConfig> element controls if and how the TDS checks
    for updates. The default is for the TDS to check for the current
    stable and development release versions, and to log that information
    in the TDS serverStartup.log file as INFO entries.

  <TdsUpdateConfig>
     <logVersionInfo>true</logVersionInfo>
  </TdsUpdateConfig>
  -->

  <!--
   The <CORS> element controls Cross-Origin Resource Sharing (CORS).
   CORS is a way to allow a website (such as THREDDS) to open up access
   to resources to web pages and applications running on a different domain.
   One example would be allowing a web-application to use fonts from
   a separate host. For TDS, this can allow a javascript app running on a
   different site to access data on a THREDDS server.
   For more information see: https://en.wikipedia.org/wiki/Cross-origin_resource_sharing
   The elements below represent defaults. Only the <enabled> tag is required
   to enable CORS. The default allowed origin is '*', which allows sharing
   to any domain.
  <CORS>
    <enabled>false</enabled>
    <maxAge>1728000</maxAge>
    <allowedMethods>GET</allowedMethods>
    <allowedHeaders>Authorization</allowedHeaders>
    <allowedOrigin>*</allowedOrigin>
  </CORS>
  -->

  <!--
   The <CatalogServices> element:
   - Services on local TDS served catalogs are always on.
   - Services on remote catalogs are set with the allowRemote element
   below. They are off by default (recommended).
   -->
  <CatalogServices>
    <allowRemote>false</allowRemote>
  </CatalogServices>

  <!--
  Configuring the CDM (netcdf-java library)
  see http://www.unidata.ucar.edu/software/netcdf-java/reference/RuntimeLoading.html

  <nj22Config>
    <ioServiceProvider class="edu.univ.ny.stuff.FooFiles"/>
    <coordSysBuilder convention="foo" class="test.Foo"/>
    <coordTransBuilder name="atmos_ln_sigma_coordinates" type="vertical" class="my.stuff.atmosSigmaLog"/>
    <typedDatasetFactory datatype="Point" class="gov.noaa.obscure.file.Flabulate"/>
  </nj22Config>
  -->

  <!--
  CDM uses the DiskCache directory to store temporary files, like uncompressed files.
  <DiskCache>
    <alwaysUse>false</alwaysUse>
    <scour>1 hour</scour>
    <maxSize>1 Gb</maxSize>
  </DiskCache>
  -->

  <!--
  Caching open NetcdfFile objects.
  default is to allow 50 - 100 open files, cleanup every 11 minutes
  <NetcdfFileCache>
    <minFiles>50</minFiles>
    <maxFiles>100</maxFiles>
    <scour>11 min</scour>
  </NetcdfFileCache>
  -->

  <!--
  The <HTTPFileCache> element:
  allow 10 - 20 open datasets, cleanup every 17 minutes
  used by HTTP Range requests.
  <HTTPFileCache>
    <minFiles>10</minFiles>
    <maxFiles>20</maxFiles>
    <scour>17 min</scour>
  </HTTPFileCache>
  -->

  <!--
  Writing GRIB indexes.
  <GribIndexing>
    <setExtendIndex>false</setExtendIndex>
    <alwaysUseCache>false</alwaysUseCache>
  </GribIndexing>
  -->

  <!--
  Persist joinNew aggregations to named directory. scour every 24 hours, delete stuff older than 90 days
  <AggregationCache>
    <scour>24 hours</scour>
    <maxAge>90 days</maxAge>
    <cachePathPolicy>NestedDirectory</cachePathPolicy>
  </AggregationCache>
  -->

  <!--
  How to choose the template dataset for an aggregation. latest, random, or penultimate
  <Aggregation>
    <typicalDataset>penultimate</typicalDataset>
  </Aggregation>
  -->

  <!--
  The Netcdf Subset Service is off by default.
  <NetcdfSubsetService>
    <allow>false</allow>
    <scour>10 min</scour>
    <maxAge>-1 min</maxAge>
  </NetcdfSubsetService>
  -->

  <!--
  <Opendap>
    <ascLimit>50</ascLimit>
    <binLimit>500</binLimit>
    <serverVersion>opendap/3.7</serverVersion>
  </Opendap>
    -->

  <!--
  The WCS Service is off by default.
  Also, off by default (and encouraged) is operating on a remote dataset.
  <WCS>
    <allow>false</allow>
    <allowRemote>false</allowRemote>
    <scour>15 min</scour>
    <maxAge>30 min</maxAge>
  </WCS>
  -->

  <!--
  <WMS>
    <allow>false</allow>
    <allowRemote>false</allowRemote>
    <maxImageWidth>2048</maxImageWidth>
    <maxImageHeight>2048</maxImageHeight>
  </WMS>
  -->

  <!--
  <NCISO>
    <ncmlAllow>false</ncmlAllow>
    <uddcAllow>false</uddcAllow>
    <isoAllow>false</isoAllow>
  </NCISO>
  -->

  <!-- CatalogGen service is off by default.
  <CatalogGen>
    <allow>false</allow>
  </CatalogGen>
   -->

  <!-- DLwriter service is off by default.
       As is support for operating on remote catalogs.
  <DLwriter>
    <allow>false</allow>
    <allowRemote>false</allowRemote>
  </DLwriter>
   -->

  <!-- DqcService is off by default.
  <DqcService>
    <allow>false</allow>
  </DqcService>
   -->

  <!--
   Link to a Viewer application on the HTML page:
   <Viewer>my.package.MyViewer</Viewer>
   -->

   <!--
   Add a DataSource - essentially an IOSP with access to Servlet request parameters
   <datasetSource>my.package.DatsetSourceImpl</datasetSource>
   -->

  <!--
   set FeatureCollection logging
  <FeatureCollection>
     <RollingFileAppender>
       <MaxFileSize>1 MB</MaxFileSize>
       <MaxBackups>5</MaxBackups>
       <Level>INFO</Level>
     </RollingFileAppender>
  </FeatureCollection>
  -->

  <!--
    Configure how the NetCDF-4 C library is discovered and used.
    libraryPath: The directory in which the native library is installed.
    libraryName: The name of the native library. This will be used to locate the proper .DLL, .SO, or .DYLIB file
      within the libraryPath directory.
    useForReading: By default, the native library is only used for writing NetCDF-4 files; a pure-Java layer is
      responsible for reading them. However, if this property is set to true, then it will be used for reading
      NetCDF-4 (and HDF5) files as well.
  -->
  <!--
  <Netcdf4Clibrary>
    <libraryPath>/usr/local/lib</libraryPath>
    <libraryName>netcdf</libraryName>
    <useForReading>false</useForReading>
  </Netcdf4Clibrary>
  -->
</threddsConfig>
21.2.9 Update the catalog
For example to update the catalog with the latest data, run the following command from the root crontab. This cronjob will also synchronize the database with remote servers and dump your database (by default in /home/carya/dump)
0 * * * * /home/carya/pecan/scripts/cron.sh -o /home/carya/dump21.2.10 Troubleshooting
Refer to the log files for Tomcat (/var/log/tomcat8/*) and Thredds (/home/carya/thredds/logs).
21.2.11 Further reading
21.2.12 OS Specific Installations
- Ubuntu
- CentOS
- OSX
- Install BETY THIS PAGE IS DEPRECATED
- Install Models
- Install Data
21.2.12.1 Ubuntu
These are specific notes for installing PEcAn on Ubuntu (14.04) and will be referenced from the main installing PEcAn page. You will at least need to install the build environment and Postgres sections. If you want to access the database/PEcAn using a web browser you will need to install Apache. To access the database using the BETY interface, you will need to have Ruby installed.
This document also contains information on how to install the Rstudio server edition as well as any other packages that can be helpful.
21.2.12.1.1 Install build environment
sudo -s

# point to latest R
echo "deb http://cran.rstudio.com/bin/linux/ubuntu `lsb_release -s -c`/" > /etc/apt/sources.list.d/R.list
apt-key adv --keyserver keyserver.ubuntu.com --recv-keys E084DAB9

# update package list
apt-get -y update

# install packages needed for PEcAn
apt-get -y install build-essential gfortran git r-base-core r-base-dev jags liblapack-dev libnetcdf-dev netcdf-bin bc libcurl4-gnutls-dev curl udunits-bin libudunits2-dev libgmp-dev python-dev libgdal1-dev libproj-dev expect

# install packages needed for ED2
apt-get -y install openmpi-bin libopenmpi-dev

# install requirements for DALEC
apt-get -y install libgsl0-dev

# install packages for webserver
apt-get -y install apache2 libapache2-mod-php5 php5

# install packages to compile docs
apt-get -y install texinfo texlive-latex-base texlive-latex-extra texlive-fonts-recommended

# install devtools
echo 'install.packages("devtools", repos="http://cran.rstudio.com/")' | R --vanilla

# done as root
exit
21.2.12.1.2 Install Postgres
Documentation: http://trac.osgeo.org/postgis/wiki/UsersWikiPostGIS21UbuntuPGSQL93Apt
sudo -s

# point to latest PostgreSQL
echo "deb http://apt.postgresql.org/pub/repos/apt `lsb_release -s -c`-pgdg main" > /etc/apt/sources.list.d/pgdg.list
wget --quiet -O - https://www.postgresql.org/media/keys/ACCC4CF8.asc | apt-key add -

# update package list
apt-get -y update

# install packages for postgresql (using a newer version than default)
apt-get -y install libdbd-pgsql postgresql postgresql-client libpq-dev postgresql-9.4-postgis-2.1 postgresql-9.4-postgis-2.1-scripts

# install following if you want to run pecan through the web
apt-get -y install php5-pgsql

# enable bety user to login with trust by adding the following lines after
# the ability of postgres user to login in /etc/postgresql/9.4/main/pg_hba.conf
local   all             bety                                    trust
host    all             bety            127.0.0.1/32            trust
host    all             bety            ::1/128                 trust

# Once done restart postgresql
/etc/init.d/postgresql restart

exit
To install the BETYdb database .. ##### Apache Configuration PEcAn
# become root
sudo -s

# get index page
rm /var/www/html/index.html
ln -s ${HOME}/pecan/documentation/index_vm.html /var/www/html/index.html

# setup a redirect
cat > /etc/apache2/conf-available/pecan.conf << EOF
Alias /pecan ${HOME}/pecan/web
<Directory ${HOME}/pecan/web>
  DirectoryIndex index.php
  Options +ExecCGI
  Require all granted
</Directory>
EOF
a2enconf pecan
/etc/init.d/apache2 restart

# done as root
exit
21.2.12.1.3 Apache Configuration BETY
sudo -s

# install all ruby related packages
apt-get -y install ruby2.0 ruby2.0-dev libapache2-mod-passenger

# link static content
ln -s ${HOME}/bety/public /var/www/html/bety

# setup a redirect
cat > /etc/apache2/conf-available/bety.conf << EOF
RailsEnv production
RailsBaseURI /bety
PassengerRuby /usr/bin/ruby2.0
<Directory /var/www/html/bety>
  Options +FollowSymLinks
  Require all granted
</Directory>
EOF
a2enconf bety
/etc/init.d/apache2 restart
21.2.12.1.4 Rstudio-server
NOTE This will allow anybody to login to the machine through the rstudio interface and run any arbitrary code. The login used however is the same as the system login/password.
# bceome root
sudo -s

# install required packages
apt-get -y install libapparmor1 apparmor-utils libssl0.9.8

# install rstudio
dpkg -i rstudio-server-*
rm rstudio-server-*
echo "www-address=127.0.0.1" >> /etc/rstudio/rserver.conf
echo "r-libs-user=~/R/library" >> /etc/rstudio/rsession.conf
rstudio-server restart

# setup rstudio forwarding in apache
a2enmod proxy_http
cat > /etc/apache2/conf-available/rstudio.conf << EOF
ProxyPass        /rstudio/ http://localhost:8787/
ProxyPassReverse /rstudio/ http://localhost:8787/
RedirectMatch permanent ^/rstudio$ /rstudio/
EOF
a2enconf rstudio
/etc/init.d/apache2 restart

# all done, exit root
exit
21.2.12.1.5 Additional packages
HDF5 Tools, netcdf, GDB and emacs
21.2.12.2 CentOS/RedHat {#centos/redhat}
These are specific notes for installing PEcAn on CentOS (7) and will be referenced from the main installing PEcAn page. You will at least need to install the build environment and Postgres sections. If you want to access the database/PEcAn using a web browser you will need to install Apache. To access the database using the BETY interface, you will need to have Ruby installed.
This document also contains information on how to install the Rstudio server edition as well as any other packages that can be helpful.
21.2.12.2.1 Install build environment
sudo -s

# install packages needed for PEcAn
yum -y groupinstall 'Development Tools'
yum -y install git netcdf-fortran-openmpi-devel R bc curl libxml2-devel openssl-devel ed  udunits2 udunits2-devel netcdf netcdf-devel gmp-devel python-devel gdal-devel proj-devel proj-epsg expect

# jags
yum -y install http://download.opensuse.org/repositories/home:/cornell_vrdc/CentOS_7/x86_64/jags3-3.4.0-54.1.x86_64.rpm
yum -y install http://download.opensuse.org/repositories/home:/cornell_vrdc/CentOS_7/x86_64/jags3-devel-3.4.0-54.1.x86_64.rpm

# fix include folder for udunits2
ln -s /usr/include/udunits2/* /usr/include/

# install packages needed for ED2
yum -y install environment-modules openmpi-bin libopenmpi-dev

# install requirements for DALEC
yum -y install gsl-devel

# install packages for webserver
yum -y install httpd php
systemctl enable httpd
systemctl start httpd
firewall-cmd --zone=public --add-port=80/tcp --permanent
firewall-cmd --reload

# install packages to compile docs
#apt-get -y install texinfo texlive-latex-base texlive-latex-extra texlive-fonts-recommended

# install devtools
echo 'install.packages("devtools", repos="http://cran.rstudio.com/")' | R --vanilla

# done as root
exit

echo "module load mpi" >> ~/.bashrc
module load mpi
21.2.12.2.1.1 Install and configure PostgreSQL, udunits2, NetCDF
sudo -s

# point to latest PostgreSQL
yum install -y epel-release
yum -y install http://yum.postgresql.org/9.4/redhat/rhel-7-x86_64/pgdg-centos94-9.4-1.noarch.rpm

# install packages for postgresql (using a newer version than default)
yum -y install postgresql94-server postgresql94-contrib postgis2_94 postgresql94-devel udunits2 netcdf

# install following if you want to run pecan through the web
yum -y install php-pgsql

# enable bety user to login with trust by adding the following lines after
# the ability of postgres user to login in /var/lib/pgsql/9.4/data/pg_hba.conf
local   all             bety                                    trust
host    all             bety            127.0.0.1/32            trust
host    all             bety            ::1/128                 trust

# Create database
/usr/pgsql-9.4/bin/postgresql94-setup initdb

# Enable postgres
systemctl enable postgresql-9.4
systemctl start postgresql-9.4

exit
21.2.12.2.2 Apache Configuration PEcAn
Install and Start Apache
# become root
sudo -s

# get index page
rm /var/www/html/index.html
ln -s /home/carya/pecan/documentation/index_vm.html /var/www/html/index.html

# fix selinux context (does this need to be done after PEcAn is installed?)
chcon -R -t httpd_sys_content_t /home/carya/pecan /home/carya/output

# setup a redirect
cat > /etc/httpd/conf.d/pecan.conf << EOF
Alias /pecan /home/carya/pecan/web
<Directory /home/carya/pecan/web>
  DirectoryIndex index.php
  Options +ExecCGI
  Require all granted
</Directory>
EOF
a2enconf pecan
/etc/init.d/apache2 restart

# done as root
exit
21.2.12.2.3 Apache Configuration BETY
sudo -s

# install all ruby related packages
sudo curl --fail -sSLo /etc/yum.repos.d/passenger.repo https://oss-binaries.phusionpassenger.com/yum/definitions/el-passenger.repo
yum -y install ruby ruby-devel mod_passenger

# link static content
ln -s /home/carya/bety/public /var/www/html/bety

# fix GemFile
echo 'gem "test-unit"' >> bety/Gemlile

# fix selinux context (does this need to be done after bety is installed?)
chcon -R -t httpd_sys_content_t /home/carya/bety

# setup a redirect
cat > /etc/httpd/conf.d/bety.conf << EOF
RailsEnv production
RailsBaseURI /bety
PassengerRuby /usr/bin/ruby
<Directory /var/www/html/bety>
  Options +FollowSymLinks
  Require all granted
</Directory>
EOF
systemctl restart httpd
21.2.12.2.4 Rstudio-server
NEED FIXING
NOTE This will allow anybody to login to the machine through the rstudio interface and run any arbitrary code. The login used however is the same as the system login/password.
# bceome root
sudo -s

# install required packages
apt-get -y install libapparmor1 apparmor-utils libssl0.9.8

# install rstudio
dpkg -i rstudio-server-*
rm rstudio-server-*
echo "www-address=127.0.0.1" >> /etc/rstudio/rserver.conf
echo "r-libs-user=~/R/library" >> /etc/rstudio/rsession.conf
rstudio-server restart

# setup rstudio forwarding in apache
a2enmod proxy_http
cat > /etc/apache2/conf-available/rstudio.conf << EOF
ProxyPass        /rstudio/ http://localhost:8787/
ProxyPassReverse /rstudio/ http://localhost:8787/
RedirectMatch permanent ^/rstudio$ /rstudio/
EOF
a2enconf rstudio
/etc/init.d/apache2 restart

# all done, exit root
exit
Alternative Rstudio instructions
21.2.12.2.5 Install and configure Rstudio-server
Install RStudio Server by following the official documentation for your platform. Then, proceed with the following:
- add
PATH=$PATH:/usr/sbin:/sbinto/etc/profile
- add rstudio.conf to /etc/httpd/conf.d/
   wget https://gist.github.com/dlebauer/6921889/raw/d1e0f945228e5519afa6223d6f49d6e0617262bd/rstudio.conf
sudo mv rstudio.conf /httpd/conf.d/- restart the Apache server:
sudo httpd restart - now you should be able to access
http://<server>/rstudio
21.2.12.2.5.1 Install ruby-netcdf gem
cd $RUBY_APPLICATION_HOME
export $NETCDF_URL=http://www.gfd-dennou.org/arch/ruby/products/ruby-netcdf/release/ruby-netcdf-0.6.6.tar.gz
export $NETCDF_DIR=/usr/local/netcdf
gem install narray
export NARRAY_DIR="$(ls $GEM_HOME/gems | grep 'narray-')"
export NARRAY_PATH="$GEM_HOME/gems/$NARRAY_DIR"
cd $MY_RUBY_HOME/bin
wget $NETCDF_URL -O ruby-netcdf.tgz
tar zxf ruby-netcdf.tgz && cd ruby-netcdf-0.6.6/
ruby -rubygems extconf.rb --with-narray-include=$NARRAY_PATH --with-netcdf-dir=/usr/local/netcdf-4.3.0
sed -i 's|rb/$|rb|' Makefile
make
make install
cd ../ && sudo rm -rf ruby-netcdf*

cd $RUBY_APPLICATION
bundle install --without development
21.2.12.2.6 Additional packages
NEED FIXING
HDF5 Tools, netcdf, GDB and emacs
21.2.12.3 Mac OSX
These are specific notes for installing PEcAn on Mac OSX and will be referenced from the main installing PEcAn page. You will at least need to install the build environment and Postgres sections. If you want to access the database/PEcAn using a web browser you will need to install Apache. To access the database using the BETY interface, you will need to have Ruby installed.
This document also contains information on how to install the Rstudio server edition as well as any other packages that can be helpful.
21.2.12.3.1 Install build environment
# install R
# download from http://cran.r-project.org/bin/macosx/

# install gfortran
# download from http://cran.r-project.org/bin/macosx/tools/

# install OpenMPI
curl -o openmpi-1.6.3.tar.gz http://www.open-mpi.org/software/ompi/v1.6/downloads/openmpi-1.6.3.tar.gz
tar zxf openmpi-1.6.3.tar.gz
cd openmpi-1.6.3
./configure --prefix=/usr/local
make all
sudo make install
cd ..

# install szip
curl -o szip-2.1-MacOSX-intel.tar.gz ftp://ftp.hdfgroup.org/lib-external/szip/2.1/bin/szip-2.1-MacOSX-intel.tar.gz
tar zxf szip-2.1-MacOSX-intel.tar.gz
sudo mv szip-2.1-MacOSX-intel /usr/local/szip

# install HDF5

curl -o hdf5-1.8.11.tar.gz http://www.hdfgroup.org/ftp/HDF5/current/src/hdf5-1.8.11.tar.gz
tar zxf hdf5-1.8.11.tar.gz
cd hdf5-1.8.11
sed -i -e 's/-O3/-O0/g' config/gnu-flags
./configure --prefix=/usr/local/hdf5 --enable-fortran --enable-cxx --with-szlib=/usr/local/szip
make
# make check
sudo make install
# sudo make check-install
cd ..
21.2.12.3.2 Install Postgres
For those on a Mac I use the following app for postgresql which has postgis already installed (http://postgresapp.com/)
To get postgis run the following commands in psql:
##### Enable PostGIS (includes raster)
CREATE EXTENSION postgis;
##### Enable Topology
CREATE EXTENSION postgis_topology;
##### fuzzy matching needed for Tiger
CREATE EXTENSION fuzzystrmatch;
##### Enable US Tiger Geocoder
CREATE EXTENSION postgis_tiger_geocoder;
To check your postgis run the following command again in psql: SELECT PostGIS_full_version();
21.2.12.3.3 Additional installs
21.2.12.3.3.1 Install JAGS
Download JAGS from http://sourceforge.net/projects/mcmc-jags/files/JAGS/3.x/Mac%20OS%20X/JAGS-Mavericks-3.4.0.dmg/download
21.2.12.3.3.2 Install udunits
Installing udunits-2 on MacOSX is done from source.
- download most recent version of Udunits here
- instructions for compiling from source
21.2.12.3.4 Apache Configuration
Mac does not support pdo/postgresql by default. The easiest way to install is use: http://php-osx.liip.ch/
To enable pecan to run from your webserver.
21.2.12.3.5 Ruby
The default version of ruby should work. Or use JewelryBox.
21.2.12.3.6 Rstudio Server
For the mac you can download Rstudio Desktop.
21.2.12.4 Installing BETY
**************THIS PAGE IS DEPRECATED*************
Official Instructions for BETY are maintained here: https://pecan.gitbook.io/betydb-documentation
If you would like to install the Docker Version of BETY, please consult the PEcAn Docker section.
21.2.12.5 Install Database + Data
- note To install BETYdb without PEcAn, first download the
load.bety.shscript
# install database (code assumes password is bety)
sudo -u postgres createuser -d -l -P -R -S bety
sudo -u postgres createdb -O bety bety
sudo -u postgres ./scripts/load.bety.sh -c YES -u YES -r 0
sudo -u postgres ./scripts/load.bety.sh -r 1
sudo -u postgres ./scripts/load.bety.sh -r 2

# configure for PEcAn web app (change password if needed)
cp web/config.example.php web/config.php

# add models to database (VM only)
./scripts/add.models.sh

# add data to database
./scripts/add.data.sh

# create outputs folder
mkdir ~/output
chmod 777 ~/output
21.2.12.6 Installing BETYdb Web Application
There are two flavors of BETY, PHP and RUBY. The PHP version allows for a minimal interaction with the database while the RUBY version allows for full interaction with the database.
21.2.12.6.1 PHP version
The php version comes with PEcAn and is already configured.
21.2.12.6.2 RUBY version
The RUBY version requires a few extra packages to be installed first.
Next we install the web app.
# install bety
cd
git clone https://github.com/PecanProject/bety.git

# install gems
cd bety
sudo gem2.0 install bundler
bundle install --without development:test:javascript_testing:debug
and configure BETY
# create folders for upload folders
mkdir paperclip/files paperclip/file_names
chmod 777 paperclip/files paperclip/file_names

# create folder for log files
mkdir log
touch log/production.log
chmod 0666 log/production.log

# fix configuration for vm
cp config/additional_environment_vm.rb config/additional_environment.rb
chmod go+w public/javascripts/cache/

# setup bety database configuration
cat > config/database.yml << EOF
production:
  adapter: postgis
  encoding: utf-8
  reconnect: false
  database: bety
  pool: 5
  username: bety
  password: bety
EOF

# setup login tokens
cat > config/initializers/site_keys.rb << EOF
REST_AUTH_SITE_KEY         = 'thisisnotasecret'
REST_AUTH_DIGEST_STRETCHES = 10
EOF
21.2.12.7 Install Models
This page contains instructions on how to download and install ecosystem models that have been or are being coupled to PEcAn. These instructions have been tested on the PEcAn unbuntu VM. Commands may vary on other operating systems. Also, some model downloads require permissions before downloading, making them unavailable to the general public. Please contact the PEcAn team if you would like access to a model that is not already installed on the default PEcAn VM.
21.2.12.8 BioCro
# Public
echo 'devtools::install_github("ebimodeling/biocro")' | R --vanilla
# Development:
echo 'devtools::install_github("ebimodeling/biocro-dev")' | R --vanilla
BioCro Developers: request from [@dlebauer on GitHub](https://github.com/dlebauer)
21.2.12.9 CLM 4.5
The version of CLM installed on PEcAn is the ORNL branch provided by Dan Ricciuto. This version includes Dan’s point-level CLM processing scripts
Download the code (~300M compressed), input data (1.7GB compressed and expands to 14 GB), and a few misc inputs.
mkdir models
cd models
wget ftp://nacp.ornl.gov/synthesis/2008/firenze/site/clm4_5_1_r085.tar.gz
wget ftp://nacp.ornl.gov/synthesis/2008/firenze/site/clm/ccsm_inputdata.tar.gz
tar -xvzf clm4_5*
tar -xvzf ccsm_inputdata.tar.gz

#Parameter file:
mkdir /home/carya/models/ccsm_inputdata/lnd/clm2/paramdata
cd  /home/carya/models/ccsm_inputdata/lnd/clm2/paramdata
wget ftp://nacp.ornl.gov/synthesis/2008/firenze/site/clm_params.c130821.nc
wget ftp://nacp.ornl.gov/synthesis/2008/firenze/site/clm_params.c140423.nc

#Domain file:
cd /home/carya/models/ccsm_inputdata/share/domains/domain.clm/
wget ftp://nacp.ornl.gov/synthesis/2008/firenze/site/domain.lnd.1x1pt_US-UMB_navy.nc

#Aggregated met data file:
cd /home/carya/models/ccsm_inputdata/atm/datm7/CLM1PT_data/1x1pt_US-UMB
wget ftp://nacp.ornl.gov/synthesis/2008/firenze/site/all_hourly.nc

## lightning database
cd /home/carya/models/ccsm_inputdata/atm/datm7/NASA_LIS/
wget ftp://nacp.ornl.gov/synthesis/2008/firenze/site/clmforc.Li_2012_climo1995-2011.T62.lnfm_Total_c140423.nc

## surface data
cd /home/carya/models/ccsm_inputdata/lnd/clm2/surfdata
wget ftp://nacp.ornl.gov/synthesis/2008/firenze/site/clm/surfdata_360x720cru_simyr1850_c130927.nc
cd /home/carya/models/ccsm_inputdata/lnd/clm2/surfdata_map
wget ftp://nacp.ornl.gov/synthesis/2008/firenze/site/clm/surfdata_1x1pt_US-UMB_I1850CLM45CN_simyr1850.nc_new
mv surfdata_1x1pt_US-UMB_I1850CLM45CN_simyr1850.nc_new surfdata_1x1pt_US-UMB_I1850CLM45CN_simyr1850.nc
Required libraries
Compile and build default inputs
cd ~/carya/models/clm4_5_1_r085/scripts
python runCLM.py --site US-UMB ––compset I1850CLM45CN --mach ubuntu --ccsm_input /home/carya/models/ccsm_inputdata --tstep 1 --nopointdata --coldstart --cpl_bypass --clean_build
21.2.12.9.1 CLM Test Run
You will see a new directory in scripts: US-UMB_I1850CLM45CN Enter this directory and run (you shouldn’t have to do this normally, but there is a bug with the python script and doing this ensures all files get to the right place):
Next you are ready to go to the run directory:
Open to edit file: datm.streams.txt.CLM1PT.CLM_USRDAT and check file paths such that all paths start with /home/carya/models/ccsm_inputdata
From this directory, launch the executable that resides in the bld directory:
not sure this was the right location, but wherever the executable is
You should begin to see output files that look like this: US-UMB_I1850CLM45CN.clm2.h0.yyyy-mm.nc (yyyy is year, mm is month) These are netcdf files containing monthly averages of lots of variables.
The lnd_in file in the run directory can be modified to change the output file frequency and variables.
21.2.12.10 DALEC
21.2.12.11 ED2
21.2.12.11.1 ED2.2 r46 (used in PEcAn manuscript)
# ----------------------------------------------------------------------
# Get version r46 with a few patches for ubuntu
cd
curl -o ED.r46.tgz http://isda.ncsa.illinois.edu/~kooper/EBI/ED.r46.tgz
tar zxf ED.r46.tgz
rm ED.r46.tgz
# ----------------------------------------------------------------------
# configure and compile ed
cd ~/ED.r46/ED/build/bin
curl -o include.mk.VM http://isda.ncsa.illinois.edu/~kooper/EBI/include.mk.opt.`uname -s`
make OPT=VM
sudo cp ../ed_2.1-VM /usr/local/bin/ed2.r46
Perform a test run using pre configured ED settings for ED2.2 r46
# ----------------------------------------------------------------------
# Create sample run
cd
mkdir testrun.ed.r46
cd testrun.ed.r46
curl -o ED2IN http://isda.ncsa.illinois.edu/~kooper/EBI/ED2IN.r46
sed -i -e "s#\$HOME#$HOME#" ED2IN
curl -o config.xml  http://isda.ncsa.illinois.edu/~kooper/EBI/config.r46.xml
# execute test run
time ed2.r46
21.2.12.11.2 ED 2.2 r82
cd
curl -o ED.r82.tgz http://isda.ncsa.illinois.edu/~kooper/EBI/ED.r82.tgz
tar zxf ED.r82.tgz
rm ED.r82.tgz

cd ED.r82
curl -o ED.r82.patch http://isda.ncsa.illinois.edu/~kooper/EBI/ED.r82.patch
patch -p1 < ED.r82.patch
cd ED/build/bin
curl -o include.mk.VM http://isda.ncsa.illinois.edu/~kooper/EBI/include.mk.opt.`uname -s`
make OPT=VM
sudo cp ../ed_2.1-VM /usr/local/bin/ed2.r82
Perform a test run using pre configured ED settings for ED2.2 r82
21.2.12.12 CLM-FATES
Prerequisites
sudo apt-get upgrade libnetcdf-dev
sudo apt-get install subversion
sudo apt-get install csh
sudo apt-get install cmake
sudo ln -s /usr/bin/make /usr/bin/gmake
sudo rm /bin/sh
sudo ln -s /bin/bash /bin/sh

wget https://github.com/Unidata/netcdf-fortran/archive/v4.4.4.tar.gz
cd netcdf-4.4.4
./configure
make
sudo make install
you might need to mess around with installing netcdf and netcdf-fortran to get a version FATES likes…
Get code from Github (currently private) and go to cime/scripts directory
git clone git@github.com:NGEET/ed-clm.git
cd ed-clm/cime/scripts/
Within CLM-FATES, to be able to build an executable we need to create a reference run. We’ll also use this reference run to grab defaults from, so we’ll be registering the location of both the reference case (location of executable, scripts, etc) and the reference inputs with the PEcAn database. To begin, copy reference run script from pecan
cp ~/pecan/models/fates/inst/create_1x1_ref_case.sh .Edit reference case script to set NETCDF_HOME, CROOT (reference run case), DIN_LOC_ROOT (reference run inputs). Also, make sure DIN_LOC_ROOT exists as FATES will not create it itself. Then run the script
./create_1x1_ref_case.shBe aware that this script WILL ask you for your password on the NCAR server to download the reference case input data (the guest password may work, haven’t tried this). If it gives an error at the pio stage check the log, but the most likely error is it being unable to find a version of netcdf it likes.
Once FATES is installed, set the whole reference case directory as the Model path (leave filename blank) and set the whole inputs directory as an Input with format clm_defaults.
21.2.12.13 GDAY
Navigate to a directory you would like to store GDAY and run the following:
gday is your executable.
21.2.12.14 JULES
INSTALL STEPS: 1) Download JULES and FCM JULES: Model requires registration to download. Not to be put on PEcAn VM Getting Started documentation: https://jules.jchmr.org/content/getting-started Registration: http://jules-lsm.github.io/access_req/JULES_access.html
FCM:
- edit makefile
open etc/fcm-make/make.cfg

set JULES_NETCDF = actual instead of dummy
set path (e.g. /usr/) and lib_path /lib64 to netCDF libraries- compile JULES
UBUNTU VERSION: installed without having to add any perl libraries
#perl stuff that I had to install on pecan2 not PEcAN VM
sudo yum install perl-Digest-SHA
sudo yum install perl-Time-modules
sudo yum install cpan
curl -L http://cpanmin.us | perl - --sudo App::cpanminus
sudo cpanm Time/Piece.pm
sudo cpanm IO/Uncompress/Gunzip.pm
Executable is under build/bin/jules.exe
Example rundir: examples/point_loobos
21.2.12.15 LINKAGES
21.2.12.15.1 R Installation
21.2.12.16 LPJ-GUESS
Instructions to download source code
Go to LPJ-GUESS website for instructions to access code.
21.2.12.17 MAESPA
Navigate to a directory you would like store MAESPA and run the following:
maespa.out is your executable. Example input files can be found in the inpufiles directory. Executing measpa.out from within one of the example directories will produce output.
MAESPA developers have also developed a wrapper package called Maeswrap. The usual R package installation method install.packages may present issues with downloading an unpacking a dependency package called rgl. Here are a couple of solutions:
21.2.12.17.1 Solution 1
then from within R
21.2.12.17.2 Solution 2
then from within R
21.2.12.18 SIPNET {inst-sipnet}
21.2.12.19 Installing data for PEcAn
PEcAn assumes some of the data to be installed on the machine. This page will describe how to install this data.
21.2.12.19.1 Site Information
These are large-ish files that contain data used with ED2 and SIPNET
rm -rf sites
curl -o sites.tgz http://isda.ncsa.illinois.edu/~kooper/EBI/sites.tgz
tar zxf sites.tgz
sed -i -e "s#/home/kooper/Projects/EBI#${PWD}#" sites/*/ED_MET_DRIVER_HEADER
rm sites.tgz

rm -rf inputs
curl -o inputs.tgz http://isda.ncsa.illinois.edu/~kooper/EBI/inputs.tgz
tar zxf inputs.tgz
rm inputs.tgz
21.2.12.19.2 FIA database
FIA database is large and will add an extra 10GB to the installation.
21.2.12.19.3 Flux Camp
Following will install the data for flux camp (as well as the demo script for PEcAn).
21.2.12.19.4 Harvard for ED tutorial
Add datasets and runs
curl -o Santarem_Km83.zip http://isda.ncsa.illinois.edu/~kooper/EBI/Santarem_Km83.zip
unzip -d sites Santarem_Km83.zip
sed -i -e "s#/home/pecan#${HOME}#" sites/Santarem_Km83/ED_MET_DRIVER_HEADER
rm Santarem_Km83.zip

curl -o testrun.s83.zip http://isda.ncsa.illinois.edu/~kooper/EBI/testrun.s83.zip
unzip testrun.s83.zip
sed -i -e "s#/home/pecan#${HOME}#" testrun.s83/ED2IN
rm testrun.s83.zip

curl -o ed2ws.harvard.tgz http://isda.ncsa.illinois.edu/~kooper/EBI/ed2ws.harvard.tgz
tar zxf ed2ws.harvard.tgz
mkdir ed2ws.harvard/analy ed2ws.harvard/histo
sed -i -e "s#/home/pecan#${HOME}#g" ed2ws.harvard/input_harvard/met_driver/HF_MET_HEADER ed2ws.harvard/ED2IN ed2ws.harvard/*.r
rm ed2ws.harvard.tgz

curl -o testrun.PDG.zip http://isda.ncsa.illinois.edu/~kooper/EBI/testrun.PDG.zip
unzip testrun.PDG.zip
sed -i -e "s#/home/pecan#${HOME}#" testrun.PDG/Met/PDG_MET_DRIVER testrun.PDG/Template/ED2IN
sed -i -e 's#/n/scratch2/moorcroft_lab/kzhang/PDG/WFire_Pecan/##' testrun.PDG/Template/ED2IN
rm testrun.PDG.zip

curl -o create_met_driver.tar.gz http://isda.ncsa.illinois.edu/~kooper/EBI/create_met_driver.tar.gz
tar zxf create_met_driver.tar.gz
rm create_met_driver.tar.gz