33 Docker
This chapter describes the PEcAn Docker container infrastructure. It contains the following sections:
- Introduction to Docker – Brief introduction to Docker and
docker-compose - Docker quickstart – Brief tutorial for setting up a Docker-based PEcAn instance
- PEcAn Docker infrastructure – Detailed description of the containers comprising the PEcAn Docker-based infrastructure
- Dockerfiles for models – General guide for writing Dockerfiles for new models
- Migrating from VM to Docker – Steps to migrate from running PEcAn on a VM to a docker.
33.1 Introduction to Docker?
33.1.1 What is Docker?
For a quick and accessible introduction to Docker, we suggest this YouTube video: Learn Docker in 12 Minutes.
For more comprehensive Docker documentation, we refer you to the Docker documentation website.
For a useful analogy for Docker containerization, we refer you to the webcomic xkcd.
Docker is a technology for encapsulating software in “containers”, somewhat similarly to virtual machines. Like virtual machines, Docker containers facilitate software distribution by bundling the software with all of its dependencies in a single location. Unlike virtual machines, Docker containers are meant to only run a single service or process and are build on top of existing services provided by the host OS (such as disk access, networking, memory management etc.).
In Docker, an image refers to a binary snapshot of a piece of software and all of its dependencies. A container refers to a running instance of a particular image. A good rule of thumb is that each container should be responsible for no more than one running process. A software stack refers to a collection of containers, each responsible for its own process, working together to power a particular application. Docker makes it easy to run multiple software stacks at the same time in parallel on the same machine. Stacks can be given a unique name, which is passed along as a prefix to all their containers. Inside these stacks, containers can communicate using generic names not prefixed with the stack name, making it easy to deploy multiple stacks with the same internal configuration. Containers within the same stack communicate with each other via a common network. Like virtual machines or system processes, Docker stacks can also be instructed to open specific ports to facilitate communication with the host and other machines.
The PEcAn database BETY provides an instructive case-study. BETY is comprised of two core processes – a PostgreSQL database, and a web-based front-end to that database (Apache web server with Ruby on Rails). Running BETY as a “Dockerized” application therefore involves two containers – one for the PostgreSQL database, and one for the web server. We could build these containers ourselves by starting from a container with nothing but the essentials of a particular operating system, but we can save some time and effort by starting with an existing image for PostgreSQL from Docker Hub. When starting a Dockerized BETY, we start the PostgreSQL container first, then start the BETY container telling it how to communicate with the PostgreSQL container. To upgrade an existing BETY instance, we stop the BETY container, download the latest version, tell it to upgrade the database, and re-start the BETY container. There is no need to install new dependencies for BETY since they are all shipped as part of the container.
The PEcAn Docker architecture is designed to facilitate installation and maintenance on a variety of systems by eliminating the need to install and maintain complex system dependencies (such as PostgreSQL, Apache web server, and Shiny server). Furthermore, using separate Docker containers for each ecosystem model helps avoid clashes between different software version requirements of different models (e.g. some models require GCC <5.0, while others may require GCC >=5.0).
The full PEcAn Docker stack is described in more detail in the next section.
33.1.2 Working with Docker
To run an image, you can use the Docker command line interface.
For example, the following runs a PostgreSQL image based on the pre-existing PostGIS image by mdillon:
docker run \
    --detach \
    --rm \
    --name postgresql \
    --network pecan \
    --publish 9876:5432 \
    --volume ${PWD}/postgres:/var/lib/postgresql/data \
    mdillon/postgis:9.6-alpine
This will start the PostgreSQL+PostGIS container. The following options were used:
--detachmakes the container run in the background.--rmremoves the container when it is finished (make sure to use the volume below).--namethe name of the container, also the hostname of the container which can be used by other docker containers in the same network inside docker.--network pecanthe network that the container should be running in, this leverages of network isolation in docker and allows this container to be connected to by others using the postgresql hostname.--publishexposes the port to the outside world, this is like ssh, and maps port 9876 to port 5432 in the docker container--volumemaps a folder on your local machine to the machine in the container. This allows you to save data on your local machine.mdillon/postgis:9.6-alpineis the actual image that will be run, in this case it comes from the group/person mdillon, the container is postgis and the version 9.6-alpine (version 9.6 build on alpine linux).
Other options that might be used:
--ttyallocate a pseudo-TTY to send stdout and stderr back to the console.--interactivekeeps stdin open so the user can interact with the application running.--envsets environment variables, these are often used to change the behavior of the docker container.
To see a list of all running containers you can use the following command:
docker psTo see the log files of this container you use the following command (you can either use their name or id as returned by docker ps). The -f flag will follow the stdout/stderr from the container, use Ctrl-C to stop following the stdout/stderr.
docker logs -f postgresqlTo stop a running container use:
docker stop postgresqlContainers that are running in the foreground (without the --detach) can be stopped by pressing Ctrl-C. Any containers running in the background (with --detach) will continue running until the machine is restarted or the container is stopped using docker stop.
33.1.3 docker-compose
For a quick introduction to docker-compose, we recommend the following YouTube video: Docker Compose in 12 Minutes.
The complete docker-compose references can be found on the Docker documentation website.
docker-compose provides a convenient way to configure and run a multi-container Docker stack.
Basically, a docker-compose setup consists of a list of containers and their configuration parameters, which are then internally converted into a bunch of docker commands.
To configure BETY as described above, we can use a docker-compose.yml file like the following:
version: "3"
services:
  postgres:
    image: mdillon/postgis:9.5
  bety:
    image: pecan/bety
    depends_on:
      - postgres
This simple file allows us to bring up a full BETY application with both database and BETY application. The BETY app will not be brought up until the database container has started.
You can now start this application by changing into the same directory as the docker-compose.yml file (cd /path/to/file) and then running:
docker-compose upThis will start the application, and you will see the log files for the 2 different containers.
33.2 Quickstart for Docker and PEcAn
This is a short documentation on how to start with Docker and PEcAn. This will not go into much detail about about how to use docker.
33.2.1 Install Docker
You will need to install docker first. See https://www.docker.com/community-edition#/download
Once Docker is installed, make sure it is running. To test that Docker is installed and running, open a terminal and run the following commands:
docker run hello-worldIf successful, this should return a message starting with "Hello from Docker!".
If this doesn’t work, there is something wrong with your configuration.
Refer to the Docker documentation for debugging.
NOTE: Depending on how Docker is installed and configured, you may have to run this command as sudo.
Try running the command without sudo first.
If that fails, but running as sudo succeeds, see these instructions for steps to use Docker as a non-root user.
33.2.2 Setup PEcAn using docker-compose
The PEcAn Docker stack is configured using a docker-compose.yml file (see also docker-compose).
If you cloned the PEcAn source from GitHub, you can find this file in the root directory of the repository.
Alternatively, if you do not want to clone the PEcAn source, you can download just this file directly from GitHub here. (NOTE that this is the latest, develop branch version. If you want a specific release, you should change the branch accordingly.).
The following instructions assume you are in the same directory as the file (if not, cd into it) and that the file is called docker-compose.yml.
The docker-compose commands assume this.
If you want to explicitly point docker-compose to a specific file, you can do so by calling all commands as docker-compose -f /path/to/my-docker-compose.yml ...other options....
(NOTE that this -f option must go immediately after docker-compose. More generally, docker-compose options are very sensitive to their location relative to other commands in the same line – that is, docker-compose -f /my/docker-compose.yml -p pecan up -d postgres is not the same as docker-compose -d postgres -p pecan up -f /my/docker-compose.yml. If expected ever don’t seem to be working, check that the arguments are in the right order.)
33.2.2.1 Initialize the PEcAn database (first time only)
The commands described in this section will set up the PEcAn database (BETY) and pre-load it with some common “default” data.
docker-compose -p pecan up -d postgres

# If you have a custom docker-compose file:
# docker-compose -f /path/to/my-docker-compose.yml -p pecan up -d postgres
The breakdown of this command is as follows:
-p pecan– This tellsdocker-composeto do all of this as part of a “project”-pwe’ll callpecan. By default, the project name is set to the name of the current working directory. The project name will be used as a prefix to all containers started by thisdocker-composeinstance (so, if we have a service calledpostgres, this will create a container calledpecan_postgres).up -d–upis a command that initializes the containers. Initialization involves downloading and building the target containers and any containers they depend on, and then running them. Normally, this happens in the foreground, printing logs directly tostderr/stdout(meaning you would have to interrupt it with Ctrl-C), but the-dflag forces this to happen more quietly and in the background.postgres– This indicates that we only want to initialize the service calledpostgres(and its dependencies). If we omitted this,docker-composewould initialize all containers in the stack.
The end result of this command is to initialize a “blank” PostGIS container that will run in the background.
This container is not connected to any data (yet), and is basically analogous to just installing and starting PostgreSQL to your system.
As a side effect, the above command will also create blank data “volumes” and a “network” that containers will use to communicate with each other.
Because our project is called pecan and docker-compose.yml describes a network called pecan, the resulting network is called pecan_pecan.
This is relevant to the following commands, which will actually initialize and populate the BETY database.
Assuming the above ran successfully, next run the following:
docker run -ti --rm --network pecan_pecan pecan/bety:latest initializeThe breakdown of this command is as follows: {#docker-run-init}
docker run– This says we will be running a specific command inside the target Docker container. Seedocker run --helpand the Docker run reference for more information.-ti– This is actually two flags,-tto allocate a pseudo-tty and-ito keep STDIN open even if detached.-tis necessary to ensure lower-level script commands run correctly.-imakes sure that the command output (stdin) is displayed.--rm– This automatically removes the resulting container once the specified command exits, as well as any volumes associated with the container. This is useful as a general “clean-up” flag for one-off commands (like this one) to make sure you don’t leave any “zombie” containers or volumes around at the end.--network pecan_pecan– This indicates that the container will use the existingpecan_pecannetwork. This network is what ensures communication between thepostgrescontainer (which, recall, is just a PostGIS installation, and has no data inside it) and the “volumes” where the actual data are persistently stored.pecan/bety:latest– This is the name of the image in which to run the specified command, in the formrepository/image:version. This is interpreted as follows:- First, it sees if there are any images called
pecan/bety:latestavailable on your local machine. If there are, it uses that one. - If that image version is not available locally, it will next try to find the image online. By default, it searches Docker Hub, such that
pecan/betygets expanded to the container athttps://hub.docker.com/r/pecan/bety. For custom repositories, a full name can be given, such ashub.ncsa.illinois.edu/pecan/bety:latest. - If
:versionis omitted, Docker assumes:latest. NOTE that while online containers should have a:latestversion, not all of them do, and if a:latestversion does not exist, Docker will be unable to find the image and will throw an error.
- First, it sees if there are any images called
- Everything after the image name (here,
pecan/bety:latest) is interpreted as an argument to the image’s specified entrypoint. For thepecan/betyimage, the entrypoint is the scriptdocker/entrypoint.shlocated in the BETY repository. Here, theinitializeargument is parsed to mean “Create a new database”, which first runspsqlcommands to create thebetyrole and database and then runs theload.bety.shscript.- NOTE: The entrypoint script that is used is the one copied into the Docker container at the time it was built, which, depending on the indicated image version and how often images are built on Docker Hub relative to updates to the source, may be older than whatever is in the source code.
- NOTE: The
load.bety.shscript is, somewhat confusingly, located in the PEcAn GitHub repository (scripts/load.bety.sh), not in the BETY repository. As part of its build process, the BETY image downloads the latestdevelopversion ofload.bety.shfrom the PEcAn repository and stores it in the root folder of the image. The relevant parts of the Dockerfile are here. As withentrypoint.sh, note that this script is only updated when the image is re-built, and because the origin is in a different repository, new versions are not built wheneverload.bety.shis updated. This is a known issue.
The above command should produce a bunch of output, some of which may look like errors. Some of these errors are normal and should not stop the command from completing successfully. You will know you have encountered more serious errors if the command exits or hangs with output resembling the following:
LINE 1: SELECT count(*) FROM formats WHERE ...
                             ^
Error: Relation `formats` does not exist
If the above command fails, you can try to fix things interactively by first opening a shell inside the container…
docker run -ti --rm --network pecan_pecan pecan/bety:latest /bin/bash…and then running the following commands, which emulate the functionality of the entrypoint.sh with the initialize argument.
# Create the bety role in the postgresql database
psql -h postgres -p 5432 -U postgres -c "CREATE ROLE bety WITH LOGIN CREATEDB NOSUPERUSER NOCREATEROLE PASSWORD 'bety'"

# Initialize the bety database itself, and set to be owned by role bety
psql -h postgres -p 5432 -U postgres -c "CREATE DATABASE bety WITH OWNER bety"

# If either of these fail with a "role/database bety already exists",
# that's fine. You can safely proceed to the next command.

# Load the actual bety database tables and values
./load.bety.sh -a "postgres" -d "bety" -p "-h postgres -p 5432" -o bety -c -u -g -m ${LOCAL_SERVER} -r 0 -w https://ebi-forecast.igb.illinois.edu/pecan/dump/all/bety.tar.gz
Note that this command may throw a bunch of errors related to functions and/or operators already existing. This is normal – it just means that the PostGIS extension to PostgreSQL is already installed. The important thing is that you see output near the end like:
CREATED SCHEMA
Loading  schema_migrations         : ADDED 61
Started psql (pid=507)
Updated  formats                   :     35 (+35)
Fixed    formats                   : 46
Updated  machines                  :     23 (+23)
Fixed    machines                  : 24
Updated  mimetypes                 :    419 (+419)
Fixed    mimetypes                 : 1095
...
...
...
Added carya41 with access_level=4 and page_access_level=1 with id=323
Added carya42 with access_level=4 and page_access_level=2 with id=325
Added carya43 with access_level=4 and page_access_level=3 with id=327
Added carya44 with access_level=4 and page_access_level=4 with id=329
Added guestuser with access_level=4 and page_access_level=4 with id=331
Once the command has finished successfully, proceed with the next step:
docker run -ti --rm --network pecan_pecan --volume pecan_pecan:/data pecan/data:developThe breakdown of this command is as follows:
docker run -ti --rm --network pecan_pecan– Same as above.--volume pecan_pecan:/data– This mounts the data from the subsequent container (pecan/data:develop) onto the current project volume, calledpecan_pecan(as with the network, the project namepecanis the prefix, and the volume name also happens to bepecanas specified in thedocker-compose.ymlfile).pecan/data:develop– As above, this is the target image to run. Since there is no argument after the image name, this command will run the default command (CMD) specified for this docker container. In this case, it is thedocker/add_data.shscript from the PEcAn repository.
Under the hood, this container runs the docker/add-data.sh script, which downloads a bunch of input files and registers them with the PEcAn database.
Successful execution of this command should take some time because it involves downloading and copying reasonably large amounts of data and performing a number of database operations.
33.2.2.2 Start PEcAn
If you already completed the above steps, you can start the full stack by just running the following:
docker-compose -p pecan up -dThis will build and start all containers required to run PEcAn.
With the -d flag, this will run all of these containers quietly in the background, and show a nice architecture diagram with the name and status of each container while they are starting.
Once this is done you have a working instance of PEcAn.
If all of the containers started successfully, you should be able to access the various components from a browser via the following URLs:
- PEcAn web interface (running models) – http://localhost:8000/pecan/ (NOTE: The trailing backslash is necessary.)
- BETY web interface – http://localhost:8000/bety/
- File browser (minio) – http://localhost:8000/minio/
- RabbitMQ management console (for managing queued processes) – http://localhost:8000/
- Traefik, webserver showing maps from URLs onto their respective containers – http://localhost:8001/
33.2.2.3 Start model runs using curl
To test PEcAn you can use the following curl statement, or use the webpage to submit a request:
curl -v -X POST \
    -F 'hostname=docker' \
    -F 'modelid=5000000002' \
    -F 'sitegroupid=1' \
    -F 'siteid=772' \
    -F 'sitename=Niwot Ridge Forest/LTER NWT1 (US-NR1)' \
    -F 'pft[]=temperate.coniferous' \
    -F 'start=2004/01/01' \
    -F 'end=2004/12/31' \
    -F 'input_met=5000000005' \
    -F 'email=' \
    -F 'notes=' \
    'http://localhost:8000/pecan/04-runpecan.php'
This should return some text with in there Location: this is shows the workflow id, you can prepend http://localhost:8000/pecan/ to the front of this, for example: http://localhost:8000/pecan/05-running.php?workflowid=99000000001. Here you will be able to see the progress of the workflow.
To see what is happening behind the scenes you can use look at the log file of the specific docker containers, once of interest are pecan_executor_1 this is the container that will execute a single workflow and pecan_sipnet_1 which executes the sipnet mode. To see the logs you use docker logs pecan_executor_1 Following is an example output:
2018-06-13 15:50:37,903 [MainThread     ] INFO    : pika.adapters.base_connection - Connecting to 172.18.0.2:5672
2018-06-13 15:50:37,924 [MainThread     ] INFO    : pika.adapters.blocking_connection - Created channel=1
2018-06-13 15:50:37,941 [MainThread     ] INFO    : root -  [*] Waiting for messages. To exit press CTRL+C
2018-06-13 19:44:49,523 [MainThread     ] INFO    : root - b'{"folder": "/data/workflows/PEcAn_99000000001", "workflowid": "99000000001"}'
2018-06-13 19:44:49,524 [MainThread     ] INFO    : root - Starting job in /data/workflows/PEcAn_99000000001.
2018-06-13 19:45:15,555 [MainThread     ] INFO    : root - Finished running job.
This shows that the executor connects to RabbitMQ, waits for messages. Once it picks up a message it will print the message, and execute the workflow in the folder passed in with the message. Once the workflow (including any model executions) is finished it will print Finished. The log file for pecan_sipnet_1 is very similar, in this case it runs the job.sh in the run folder.
To run multiple executors in parallel you can duplicate the executor section in the docker-compose file and just rename it from executor to executor1 and executor2 for example. The same can be done for the models. To make this easier it helps to deploy the containers using Kubernetes allowing to easily scale up and down the containers.
33.3 PEcAn Docker Architecture
33.3.1 Overview
The PEcAn docker architecture consists of many containers (see figure below) that will communicate with each other. The goal of this architecture is to easily expand the PEcAn system by deploying new model containers and registering them with PEcAn. Once this is done the user can now use these new models in their work. The PEcAn framework will setup the configurations for the models, and send a message to the model containers to start execution. Once the execution is finished the PEcAn framework will continue. This is exactly as if the model is running on a HPC machine. Models can be executed in parallel by launching multiple model containers.
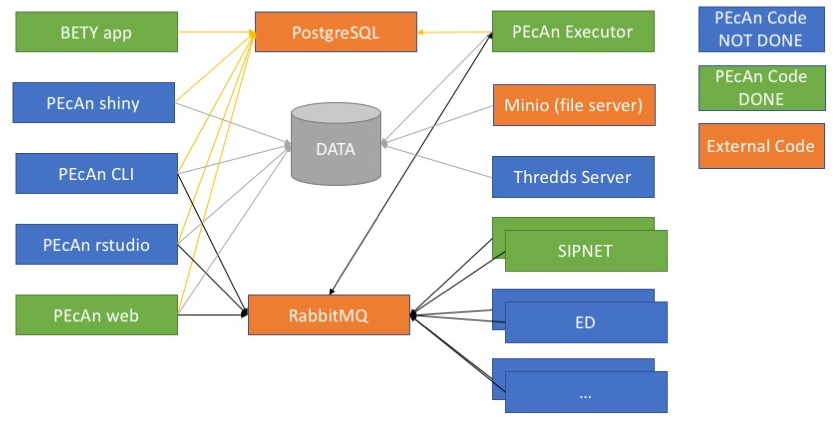
As can be seen in the figure the architecture leverages of two standard containers (in orange). The first container is postgresql with postgis (mdillon/postgis) which is used to store the database used by both BETY and PEcAn. The second containers is a messagebus, more specifically RabbitMQ (rabbitmq).
The BETY app container (pecan/bety) is the front end to the BETY database and is connected to the postgresql container. A http server can be put in front of this container for SSL termination as well to allow for load balancing (by using multiple BETY app containers).
The PEcAn framework containers consist of multiple unique ways to interact with the PEcAn system (none of these containers will have any models installed):
- PEcAn shiny hosts the shiny applications developed and will interact with the database to get all information necessary to display
- PEcAn rstudio is a rstudio environment with the PEcAn libraries preloaded. This allows for prototyping of new algorithms that can be used as part of the PEcAn framework later.
- PEcAn web allows the user to create a new PEcAn workflow. The workflow is stored in the database, and the models are executed by the model containers.
- PEcAn cli will allow the user to give a pecan.xml file that will be executed by the PEcAn framework. The workflow created from the XML file is stored in the database, and the models are executed by the model containers.
The model containers contain the actual models that are executed as well as small wrappers to make them work in the PEcAn framework. The containers will run the model based on the parameters received from the message bus and convert the outputs back to the standard PEcAn output format. Once the container is finished processing a message it will immediatly get the next message and start processing it.
33.3.2 PEcAn’s docker-compose
The PEcAn Docker architecture is described in full by the PEcAn docker-compose.yml file.
For full docker-compose syntax, see the official documentation.
This section describes the top-level structure and each of the services, which are as follows:
For reference, the complete docker-compose file is as follows:
version: '3'
services:
  traefik:
    image: traefik:latest
    command:
    - --loglevel=INFO
    - --api
    - --defaultentrypoints=https,http
    - --entryPoints=Name:http Address::${TRAEFIK_HTTP_PORT:-8000} ${TRAEFIK_HTTP_REDIRECT:-""}
    - --entryPoints=Name:https Address::${TRAEFIK_HTTPS_PORT:-8443} ${TRAEFIK_HTTPS_OPTIONS:-TLS}
    - --acme=${TRAEFIK_ACME_ENABLE:-false}
    - --acme.email=${TRAEFIK_ACME_EMAIL:-""}
    - --acme.entrypoint=https
    - --acme.onhostrule=true
    - --acme.storage=/config/acme.json
    - --acme.httpchallenge.entrypoint=http
    - --acme.storage=/config/acme.json
    - --acme.acmelogging=true
    - --docker=true
    - --docker.endpoint=unix:///var/run/docker.sock
    - --docker.exposedbydefault=false
    - --docker.watch=true
    restart: unless-stopped
    networks: pecan
    ports:
    - ${TRAEFIK_HTTP_PORT-8000}:${TRAEFIK_HTTP_PORT:-8000}
    - ${TRAEFIK_HTTPS_PORT-8443}:${TRAEFIK_HTTPS_PORT:-8443}
    labels:
    - traefik.enable=true
    - traefik.backend=traefik
    - traefik.port=8080
    - 'traefik.frontend.rule=${TRAEFIK_FRONTEND_RULE:-}PathPrefixStrip: /traefik'
    - traefik.website.frontend.whiteList.sourceRange=${TRAEFIK_IPFILTER:-172.16.0.0/12}
    volumes:
    - /var/run/docker.sock:/var/run/docker.sock:ro
    - traefik:/config
  portainer:
    image: portainer/portainer:latest
    command:
    - --admin-password=${PORTAINER_PASSWORD:-}
    - --host=unix:///var/run/docker.sock
    restart: unless-stopped
    networks: pecan
    labels:
    - traefik.enable=true
    - traefik.backend=portainer
    - 'traefik.frontend.rule=${TRAEFIK_FRONTEND_RULE:-}PathPrefixStrip: /portainer'
    - traefik.website.frontend.whiteList.sourceRange=${TRAEFIK_IPFILTER:-172.16.0.0/12}
    volumes:
    - /var/run/docker.sock:/var/run/docker.sock
    - portainer:/data
  minio:
    image: minio/minio:latest
    command: server /data
    restart: unless-stopped
    networks: pecan
    environment:
    - MINIO_ACCESS_KEY=${MINIO_ACCESS_KEY:-carya}
    - MINIO_SECRET_KEY=${MINIO_SECRET_KEY:-illinois}
    labels:
    - traefik.enable=true
    - traefik.backend=minio
    - traefik.port=9000
    - traefik.frontend.rule=${TRAEFIK_FRONTEND_RULE:-}PathPrefix:/minio/
    volumes: pecan:/data
  thredds:
    image: pecan/thredds:${PECAN_VERSION:-latest}
    restart: unless-stopped
    networks: pecan
    volumes: pecan:/data
    labels:
    - traefik.enable=true
    - traefik.port=8080
    - traefik.frontend.rule=${TRAEFIK_FRONTEND_RULE:-}PathPrefix:/thredds
    - traefik.backend=thredds
  rabbitmq:
    image: rabbitmq:management
    restart: unless-stopped
    networks: pecan
    environment:
    - RABBITMQ_SERVER_ADDITIONAL_ERL_ARGS=-rabbitmq_management path_prefix "/rabbitmq"
    - RABBITMQ_DEFAULT_USER=${RABBITMQ_DEFAULT_USER:-guest}
    - RABBITMQ_DEFAULT_PASS=${RABBITMQ_DEFAULT_PASS:-guest}
    labels:
    - traefik.enable=true
    - traefik.backend=rabbitmq
    - traefik.port=15672
    - traefik.frontend.rule=${TRAEFIK_FRONTEND_RULE:-}PathPrefix:/rabbitmq
    - traefik.website.frontend.whiteList.sourceRange=${TRAEFIK_IPFILTER:-172.16.0.0/12}
    volumes: rabbitmq:/var/lib/rabbitmq
  postgres:
    image: mdillon/postgis:9.5
    restart: unless-stopped
    networks: pecan
    volumes: postgres:/var/lib/postgresql/data
  bety:
    image: pecan/bety:${BETY_VERSION:-latest}
    restart: unless-stopped
    networks: pecan
    environment:
    - UNICORN_WORKER_PROCESSES=1
    - SECRET_KEY_BASE=${BETY_SECRET_KEY:-notasecret}
    - RAILS_RELATIVE_URL_ROOT=/bety
    - LOCAL_SERVER=${BETY_LOCAL_SERVER:-99}
    depends_on: postgres
    labels:
    - traefik.enable=true
    - traefik.frontend.rule=${TRAEFIK_FRONTEND_RULE:-}PathPrefix:/bety/
    - traefik.backend=bety
  docs:
    image: pecan/docs:${PECAN_VERSION:-latest}
    restart: unless-stopped
    networks: pecan
    labels:
    - traefik.enable=true
    - traefik.frontend.rule=${TRAEFIK_FRONTEND_RULE:-}PathPrefix:/
    - traefik.backend=docs
  web:
    image: pecan/web:${PECAN_VERSION:-latest}
    restart: unless-stopped
    networks: pecan
    environment:
    - RABBITMQ_URI=${RABBITMQ_URI:-amqp://guest:guest@rabbitmq/%2F}
    - FQDN=${PECAN_FQDN:-docker}
    - NAME=${PECAN_NAME:-docker}
    depends_on:
    - postgres
    - rabbitmq
    labels:
    - traefik.enable=true
    - traefik.frontend.rule=${TRAEFIK_FRONTEND_RULE:-}PathPrefix:/pecan/
    - traefik.backend=pecan
    volumes:
    - pecan:/data
    - pecan:/var/www/html/pecan/data
  executor:
    image: pecan/executor:${PECAN_VERSION:-latest}
    restart: unless-stopped
    networks: pecan
    environment:
    - RABBITMQ_URI=${RABBITMQ_URI:-amqp://guest:guest@rabbitmq/%2F}
    - FQDN=${PECAN_FQDN:-docker}
    depends_on:
    - postgres
    - rabbitmq
    volumes: pecan:/data
  sipnet:
    image: pecan/model-sipnet-136:${PECAN_VERSION:-latest}
    restart: unless-stopped
    networks: pecan
    environment: RABBITMQ_URI=${RABBITMQ_URI:-amqp://guest:guest@rabbitmq/%2F}
    depends_on: rabbitmq
    volumes: pecan:/data
  ed2:
    image: pecan/model-ed2-git:${PECAN_VERSION:-latest}
    restart: unless-stopped
    networks: pecan
    environment: RABBITMQ_URI=${RABBITMQ_URI:-amqp://guest:guest@rabbitmq/%2F}
    depends_on: rabbitmq
    volumes: pecan:/data
networks:
  pecan: ~
volumes:
  traefik: ~
  postgres: ~
  rabbitmq: ~
  pecan: ~
  portainer: ~
There are two ways you can override different values in the docker-compose.yml file. The first method is to create a file called .env that is placed in the same folder as the docker-compose.yml file. This file can override some of configuration variables used by docker-compose. For example the following is an example of the env file
# This file will override the configation options in the docker-compose
# file. Copy this file to the same folder as docker-compose as .env

# ----------------------------------------------------------------------
# GENERAL CONFIGURATION
# ----------------------------------------------------------------------

# Folder to store all data
DATA_DIR=/home/kooper/pecan

# ----------------------------------------------------------------------
# TRAEFIK CONFIGURATION
# ----------------------------------------------------------------------

# hostname of server
TRAEFIK_HOST=Host:pecan-docker.ncsa.illinois.edu;

# only allow access from localhost and NCSA
TRAEFIK_IPFILTER=172.16.0.0/12, 141.142.0.0/16

# Run traffik on port 80 (http) and port 443 (https)
TRAEFIK_HTTP_PORT=80
TRAEFIK_HTTPS_PORT=443
TRAEFIK_HTTPS_OPTIONS=TLS

# enable SSL cerificate generation
TRAEFIK_ACME_ENABLE=true

# Use you real email address here to be notified if cert expires
TRAEFIK_ACME_EMAIL=pecanproj@gmail.com

# Always use https, trafic to http is redirected to https
TRAEFIK_HTTP_REDIRECT=Redirect.EntryPoint:https

# ----------------------------------------------------------------------
# PEcAn CONFIGURATION
# ----------------------------------------------------------------------

# what version of pecan to use
PECAN_VERSION=develop

# the fully qualified hostname used for this server
PECAN_FQDN=pecan-docker.ncsa.illinois.edu

# short name shown in the menu
PECAN_FQDN=pecan-docker

# ----------------------------------------------------------------------
# BETY CONFIGURATION
# ----------------------------------------------------------------------

# what version of BETY to use
BETY_VERSION=latest

# what is our server number, 99=vm, 98=docker
BETY_LOCAL_SERVER=98

# secret used to encrypt cookies in BETY
BETY_SECRET_KEY=1208q7493e8wfhdsohfo9ewhrfiouaho908ruq30oiewfdjspadosuf08q345uwrasdy98t7q243

# ----------------------------------------------------------------------
# MINIO CONFIGURATION
# ----------------------------------------------------------------------

# minio username and password
MINIO_ACCESS_KEY=carya
MINIO_SECRET_KEY=illinois

# ----------------------------------------------------------------------
# PORTAINER CONFIGURATION
# ----------------------------------------------------------------------

# password for portainer admin account
# use docker run --rm httpd:2.4-alpine htpasswd -nbB admin <password> | cut -d ":" -f 2
PORTAINER_PASSWORD=$2y$05$5meDPBtS3NNxyGhBpYceVOxmFhiiC3uY5KEy2m0YRbWghhBr2EVn2

# ----------------------------------------------------------------------
# RABBITMQ CONFIGURATION
# ----------------------------------------------------------------------

# RabbitMQ username and password
RABBITMQ_DEFAULT_USER=carya
RABBITMQ_DEFAULT_PASS=illinois

# create the correct URI with above username and password
RABBITMQ_URI=amqp://carya:illinois@rabbitmq/%2F
You can also extend the docker-compose.yml file with a docker-compose.override.yml file (in the same directory), allowing you to add more services, or for example to change where the volumes are stored (see official documentation). For example the following will change the volume for postgres to be stored in your home directory:
version: "3"

volumes:
  postgres:
    driver_opts:
      type: none
      device: ${HOME}/postgres
      o: bind
33.3.2.1 Top-level structure
The root of the docker-compose.yml file contains three sections:
services– This is a list of services provided by the application, with each service corresponding to a container. When communicating with each other internally, the hostnames of containers correspond to their names in this section. For instance, regardless of the “project” name passed todocker-compose up, the hostname for connecting to the PostgreSQL database of any given container is always going to bepostgres(e.g. you should be able to access the PostgreSQL database by calling the following from inside the container:psql -d bety -U bety -h postgres). The services comprising the PEcAn application are described below.networks– This is a list of networks used by the application. Containers can only communicate with each other (via ports and hostnames) if they are on the same Docker network, and containers on different networks can only communicate through ports exposed by the host machine. We just provide the network name (pecan) and resort to Docker’s default network configuration. Note that the services we want connected to this network include anetworks: ... - pecantag. For more details on Docker networks, see the official documentation.volumes– Similarly tonetworks, this just contains a list of volume names we want. Briefly, in Docker, volumes are directories containing files that are meant to be shared across containers. Each volume corresponds to a directory, which can be mounted at a specific location by different containers. For example, syntax likevolumes: ... - pecan:/datain a service definition means to mount thepecan“volume” (including its contents) in the/datadirectory of that container. Volumes also allow data to persist on containers between restarts, as normally, any data created by a container during its execution is lost when the container is re-launched. For example, using a volume for the database allows data to be saved between different runs of the database container. Without volumes, we would start with a blank database every time we restart the containers. For more details on Docker volumes, see the official documentation. Here, we define three volumes:postgres– This contains the data files underlying the PEcAn PostgreSQL database (BETY). Notice that it is mounted by thepostgrescontainer to/var/lib/postgresql/data. This is the data that we pre-populate when we run the Docker commands to initialize the PEcAn database. Note that these are the values stored directly in the PostgreSQL database. The default files to which the database points (i.e.dbfiles) are stored in thepecanvolume, described below.rabbitmq– This volume contains persistent data for RabbitMQ. It is only used by therabbitmqservice.pecan– This volume contains PEcAn’sdbfiles, which include downloaded and converted model inputs, processed configuration files, and outputs. It is used by almost all of the services in the PEcAn stack, and is typically mounted to/data.
33.3.2.2 traefik
Traefik manages communication among the different PEcAn services and between PEcAn and the web.
Among other things, traefik facilitates the setup of web access to each PEcAn service via common and easy-to-remember URLs.
For instance, the following lines in the web service configure access to the PEcAn web interface via the URL http://localhost:8000/pecan/ :
labels:
- traefik.enable=true
- traefik.frontend.rule=${TRAEFIK_FRONTEND_RULE:-}PathPrefix:/pecan/
- traefik.backend=pecan
(Further details in the works…)
The traefik service configuration looks like this:
traefik:
  image: traefik:latest
  command:
  - --loglevel=INFO
  - --api
  - --defaultentrypoints=https,http
  - --entryPoints=Name:http Address::${TRAEFIK_HTTP_PORT:-8000} ${TRAEFIK_HTTP_REDIRECT:-""}
  - --entryPoints=Name:https Address::${TRAEFIK_HTTPS_PORT:-8443} ${TRAEFIK_HTTPS_OPTIONS:-TLS}
  - --acme=${TRAEFIK_ACME_ENABLE:-false}
  - --acme.email=${TRAEFIK_ACME_EMAIL:-""}
  - --acme.entrypoint=https
  - --acme.onhostrule=true
  - --acme.storage=/config/acme.json
  - --acme.httpchallenge.entrypoint=http
  - --acme.storage=/config/acme.json
  - --acme.acmelogging=true
  - --docker=true
  - --docker.endpoint=unix:///var/run/docker.sock
  - --docker.exposedbydefault=false
  - --docker.watch=true
  restart: unless-stopped
  networks: pecan
  ports:
  - ${TRAEFIK_HTTP_PORT-8000}:${TRAEFIK_HTTP_PORT:-8000}
  - ${TRAEFIK_HTTPS_PORT-8443}:${TRAEFIK_HTTPS_PORT:-8443}
  labels:
  - traefik.enable=true
  - traefik.backend=traefik
  - traefik.port=8080
  - 'traefik.frontend.rule=${TRAEFIK_FRONTEND_RULE:-}PathPrefixStrip: /traefik'
  - traefik.website.frontend.whiteList.sourceRange=${TRAEFIK_IPFILTER:-172.16.0.0/12}
  volumes:
  - /var/run/docker.sock:/var/run/docker.sock:ro
  - traefik:/config
33.3.2.3 portainer
portainer is lightweight management UI that allows you to manage the docker host (or swarm). You can use this service to monitor the different containers, see the logfiles, and start and stop containers.
The portainer service configuration looks like this:
portainer:
  image: portainer/portainer:latest
  command:
  - --admin-password=${PORTAINER_PASSWORD:-}
  - --host=unix:///var/run/docker.sock
  restart: unless-stopped
  networks: pecan
  labels:
  - traefik.enable=true
  - traefik.backend=portainer
  - 'traefik.frontend.rule=${TRAEFIK_FRONTEND_RULE:-}PathPrefixStrip: /portainer'
  - traefik.website.frontend.whiteList.sourceRange=${TRAEFIK_IPFILTER:-172.16.0.0/12}
  volumes:
  - /var/run/docker.sock:/var/run/docker.sock
  - portainer:/data
Portainer is accessible by browsing to localhost:8000/portainer/. You can either set the password in the .env file (for an example see env.example) or you can use the web browser and go to the portainer url. If this is the first time it will ask for your password.
33.3.2.4 minio
Minio is a service that provides access to the a folder on disk through a variety of protocols, including S3 buckets and web-based access. We mainly use Minio to facilitate access to PEcAn data using a web browser without the need for CLI tools.
Our current configuration is as follows:
minio:
  image: minio/minio:latest
  command: server /data
  restart: unless-stopped
  networks: pecan
  environment:
  - MINIO_ACCESS_KEY=${MINIO_ACCESS_KEY:-carya}
  - MINIO_SECRET_KEY=${MINIO_SECRET_KEY:-illinois}
  labels:
  - traefik.enable=true
  - traefik.backend=minio
  - traefik.port=9000
  - traefik.frontend.rule=${TRAEFIK_FRONTEND_RULE:-}PathPrefix:/minio/
  volumes: pecan:/data
The Minio interface is accessible by browsing to localhost:8000/minio/.
From there, you can browse directories and download files.
You can also upload files by clicking the red “+” in the bottom-right corner.
Note that it is currently impossible to create or upload directories using the Minio interface (except in the /data root directory – those folders are called “buckets” in Minio).
Therefore, the recommended way to perform any file management tasks other than individual file uploads is through the command line, e.g.
docker run -it --rm --volumes pecan_pecan:/data --volumes /path/to/local/directory:/localdir ubuntu

# Now, you can move files between `/data` and `/localdir`, create new directories, etc.
33.3.2.5 thredds
This service allows PEcAn model outputs to be accessible via the THREDDS data server (TDS). When the PEcAn stack is running, the catalog can be explored in a web browser at http://localhost:8000/thredds/catalog.html. Specific output files can also be accessed from the command line via commands like the following:
nc <- ncdf4::nc_open("http://localhost:8000/thredds/dodsC/outputs/PEcAn_<workflow_id>/out/<run_id>/<year>.nc")Note that everything after outputs/ exactly matches the directory structure of the workflows directory.
Which files are served, which subsetting services are available, and other aspects of the data server’s behavior are configured in the docker/thredds_catalog.xml file.
Specifically, this XML tells the data server to use the datasetScan tool to serve all files within the /data/workflows directory, with the additional filter that only files ending in .nc are served.
For additional information about the syntax of this file, see the extensive THREDDS documentation.
Our current configuration is as follows:
thredds:
  image: pecan/thredds:${PECAN_VERSION:-latest}
  restart: unless-stopped
  networks: pecan
  volumes: pecan:/data
  labels:
  - traefik.enable=true
  - traefik.port=8080
  - traefik.frontend.rule=${TRAEFIK_FRONTEND_RULE:-}PathPrefix:/thredds
  - traefik.backend=thredds
33.3.2.6 postgres
This service provides a working PostGIS database. Our configuration is fairly straightforward:
postgres:
  image: mdillon/postgis:9.5
  restart: unless-stopped
  networks: pecan
  volumes: postgres:/var/lib/postgresql/data
Some additional details about our configuration:
image– This pulls a container with PostgreSQL + PostGIS pre-installed. Note that by default, we use PostgreSQL version 9.5. To experiment with other versions, you can change9.5accordingly.networks– This allows PostgreSQL to communicate with other containers on thepecannetwork. As mentioned above, the hostname of this service is just its name, i.e.postgres, so to connect to the database from inside a running container, use a command like the following:psql -d bety -U bety -h postgresvolumes– Note that the PostgreSQL data files (which store the values in the SQL database) are stored on a volume calledpostgres(which is not the same as thepostgresservice, even though they share the same name).
33.3.2.7 rabbitmq
RabbitMQ is a message broker service. In PEcAn, RabbitMQ functions as a task manager and scheduler, coordinating the execution of different tasks (such as running models and analyzing results) associated with the PEcAn workflow.
Our configuration is as follows:
rabbitmq:
  image: rabbitmq:management
  restart: unless-stopped
  networks: pecan
  environment:
  - RABBITMQ_SERVER_ADDITIONAL_ERL_ARGS=-rabbitmq_management path_prefix "/rabbitmq"
  - RABBITMQ_DEFAULT_USER=${RABBITMQ_DEFAULT_USER:-guest}
  - RABBITMQ_DEFAULT_PASS=${RABBITMQ_DEFAULT_PASS:-guest}
  labels:
  - traefik.enable=true
  - traefik.backend=rabbitmq
  - traefik.port=15672
  - traefik.frontend.rule=${TRAEFIK_FRONTEND_RULE:-}PathPrefix:/rabbitmq
  - traefik.website.frontend.whiteList.sourceRange=${TRAEFIK_IPFILTER:-172.16.0.0/12}
  volumes: rabbitmq:/var/lib/rabbitmq
Note that the traefik.frontend.rule indicates that browsing to http://localhost:8000 (with no further tags) leads to the RabbitMQ management console.
By default, the RabbitMQ management console has username/password guest/guest, which is highly insecure.
For production instances of PEcAn, we highly recommend changing these credentials to something more secure, and removing access to the RabbitMQ management console via Traefik.
33.3.2.8 bety
This service operates the BETY web interface, which is effectively a web-based front-end to the PostgreSQL database.
Unlike the postgres service, which contains all the data needed to run PEcAn models, this service is not essential to the PEcAn workflow.
However, note that certain features of the PEcAn web interface do link to the BETY web interface and will not work if this container is not running.
Our configuration is as follows:
bety:
  image: pecan/bety:${BETY_VERSION:-latest}
  restart: unless-stopped
  networks: pecan
  environment:
  - UNICORN_WORKER_PROCESSES=1
  - SECRET_KEY_BASE=${BETY_SECRET_KEY:-notasecret}
  - RAILS_RELATIVE_URL_ROOT=/bety
  - LOCAL_SERVER=${BETY_LOCAL_SERVER:-99}
  depends_on: postgres
  labels:
  - traefik.enable=true
  - traefik.frontend.rule=${TRAEFIK_FRONTEND_RULE:-}PathPrefix:/bety/
  - traefik.backend=bety
The BETY container Dockerfile is located in the root directory of the BETY GitHub repository (direct link).
33.3.2.9 web
This service runs the PEcAn web interface. It is effectively a thin wrapper around a standard Apache web server container from Docker Hub that installs some additional dependencies and copies over the necessary files from the PEcAn source code.
Our configuration is as follows:
web:
  image: pecan/web:${PECAN_VERSION:-latest}
  restart: unless-stopped
  networks: pecan
  environment:
  - RABBITMQ_URI=${RABBITMQ_URI:-amqp://guest:guest@rabbitmq/%2F}
  - FQDN=${PECAN_FQDN:-docker}
  - NAME=${PECAN_NAME:-docker}
  depends_on:
  - postgres
  - rabbitmq
  labels:
  - traefik.enable=true
  - traefik.frontend.rule=${TRAEFIK_FRONTEND_RULE:-}PathPrefix:/pecan/
  - traefik.backend=pecan
  volumes:
  - pecan:/data
  - pecan:/var/www/html/pecan/data
Its Dockerfile ships with the PEcAn source code, in docker/base/Dockerfile.web.
In terms of actively developing PEcAn using Docker, this is the service to modify when making changes to the web interface (i.e. PHP, HTML, and JavaScript code located in the PEcAn web directory).
33.3.2.10 executor
This service is in charge of running the R code underlying the core PEcAn workflow. However, it is not in charge of executing the models themselves – model binaries are located on their own dedicated Docker containers, and model execution is coordinated by RabbitMQ.
Our configuration is as follows:
executor:
  image: pecan/executor:${PECAN_VERSION:-latest}
  restart: unless-stopped
  networks: pecan
  environment:
  - RABBITMQ_URI=${RABBITMQ_URI:-amqp://guest:guest@rabbitmq/%2F}
  - FQDN=${PECAN_FQDN:-docker}
  depends_on:
  - postgres
  - rabbitmq
  volumes: pecan:/data
Its Dockerfile is ships with the PEcAn source code, in docker/base/Dockerfile.executor.
Its image is built on top of the pecan/base image (docker/base/Dockerfile.base), which contains the actual PEcAn source.
To facilitate caching, the pecan/base image is itself built on top of the pecan/depends image (docker/base/Dockerfile.depends), a large image that contains an R installation and PEcAn’s many system and R package dependencies (which usually take ~30 minutes or longer to install from scratch).
In terms of actively developing PEcAn using Docker, this is the service to modify when making changes to the PEcAn R source code.
Note that, unlike changes to the web image’s PHP code, changes to the R source code do not immediately propagate to the PEcAn container; instead, you have to re-compile the code by running make inside the container.
33.3.2.11 Model-specific containers
Additional models are added as additional services. In general, their configuration should be similar to the following configuration for SIPNET, which ships with PEcAn:
sipnet:
  image: pecan/model-sipnet-136:${PECAN_VERSION:-latest}
  restart: unless-stopped
  networks: pecan
  environment: RABBITMQ_URI=${RABBITMQ_URI:-amqp://guest:guest@rabbitmq/%2F}
  depends_on: rabbitmq
  volumes: pecan:/data
The PEcAn source contains Dockerfiles for ED2 (docker/models/Dockerfile.ed2) and SIPNET (docker/models/Dockerfile.sipnet) that can serve as references.
For additional tips on constructing a Dockerfile for your model, see Dockerfiles for Models.
33.4 Dockerfiles for Models
In general we try to minimize the size of the images. To be able to do this we split the process of creating the building of the model images into two pieces (or leverage of an image that exists from the original model developers). If you look at the example Dockerfile you will see that there are 2 sections, the first section will build the model binary, the second section will build the actual PEcAn model, which copies the binary from the first section.
This is an example of how the ED2 model is build. This will install all the packages needed to build ED2 model, gets the latest version from GitHub and builds the model.
The second section will create the actual model executor. This will leverage the PEcAn executor image that has PEcAn already installed as well as the python code to listen for messages and run the actual model code. This will install some additional packages needed by the model binary (more about that below) as well as set the MODEL_TYPE and MODEL_VERSION variables. These variables will be used to specify the queue that the model will listen on for any execution requests.
It is important that the MODEL_TYPE and MODEL_VERSION match what is in the BETY database. The PEcAn code will use what is in the BETY database to send out a message to a specfic worker queue, if you do not set these variables correctly your model executor will pick up messages for the wrong model.
To build the docker image, we use a Dockerfile (see example below) and run the following command. This command will expect the Dockerfile.ed2 to live in the current folder. It will also copy the content of the current folder and make it available to the build process (in this example we do not need any additional files). The image will be named pecan/model-ed2, since we do not specify the exact version it will be atomically be named pecan/model-ed2:latest.
docker build \
    --tag pecan/model-ed2 \
    --file Dockerfile.ed2 \
    .
Example of a Dockerfile, in this case to build the ED2 model.
# ----------------------------------------------------------------------
# FIRST STAGE : BUILD MODEL BINARY
# ----------------------------------------------------------------------
FROM debian:testing as model-binary

# Some variables that can be used to set control the docker build
ARG MODEL_VERSION=git

# install dependencies
RUN apt-get update \
    && apt-get install -y \
       build-essential \
       curl \
       gfortran \
       git \
       libhdf5-dev \
       libopenmpi-dev \
    && rm -rf /var/lib/apt/lists/*

# download, unzip and build ed2
WORKDIR /src
RUN git clone https://github.com/EDmodel/ED2.git \
    && cd ED2/ED/build \
    && curl -o make/include.mk.VM http://isda.ncsa.illinois.edu/~kooper/EBI/include.mk.opt.Linux \
    && if [ "${MODEL_VERSION}" != "git" ]; then git checkout ${MODEL_VERSION}; fi \
    && ./install.sh -g -p VM

########################################################################

# ----------------------------------------------------------------------
# SECOND STAGE : BUILD PECAN FOR MODEL
# ----------------------------------------------------------------------
FROM pecan/executor:latest

# ----------------------------------------------------------------------
# INSTALL MODEL SPECIFIC PIECES
# ----------------------------------------------------------------------

RUN apt-get update \
    && apt-get install -y --no-install-recommends \
       libgfortran5 \
       libopenmpi3 \
    && rm -rf /var/lib/apt/lists/*

# ----------------------------------------------------------------------
# SETUP FOR SPECIFIC MODEL
# ----------------------------------------------------------------------

# Some variables that can be used to set control the docker build
ARG MODEL_VERSION=git

# variables to store in docker image
ENV APPLICATION="./job.sh" \
    MODEL_TYPE="ED2" \
    MODEL_VERSION="${MODEL_VERSION}"

ENV RABBITMQ_QUEUE="${MODEL_TYPE}_${MODEL_VERSION}"

# COPY model binary
COPY --from=model-binary /src/ED2/ED/build/ed_2.1-opt /usr/local/bin/ed2.${MODEL_VERSION}WARNING: Dockerfile environment variables set via ENV are assigned all at once; they do not evaluate successively, left to right.
Consider the following block:
# Don't do this!
ENV MODEL_TYPE="SIPNET" \
    MODEL_VERSION=136 \
    RABBITMQ_QUEUE=${MODEL_TYPE}_${MODEL_VERSION}   # <- Doesn't know about MODEL_TYPE or MODEL_VERSION!
In this block, the expansion for setting RABBITMQ_QUEUE is not aware of the current values of MODEL_TYPE or MODEL_VERSION, and will therefore be set incorrectly to just _ (unless they have been set previously, in which case it will be aware only of their earlier values).
As such, variables depending on other variables must be set in a separate, subsequent ENV statement than the variables they depend on.
Once the model has build and is working we can add it to the PEcAn stack and be able to use this model in the web interface. There are two methods to start this new model. First, we can add it to the docker-compose.yml file and start the container using docker-compose -p pecan -d up.
  sipnet:
    image: pecan/model-ed2
    networks:
      - pecan
    volumes:
      - pecan:/data
    depends_on:
       - rabbitmq
    restart: unless-stopped
Alternatively we can start the container manually using the following command.
docker run \
    --detach \
    --rm \
    --name pecan-ed2 \
    --networks pecan_pecan \
    --volume pecan_pecan:/data
    pecan/model-ed2
33.4.1 Common problems
Following are some solutions for common problems that you might encounter when building the docker images for a model.
33.4.1.1 Debugging missing libraries
When building the model binary it might require specific libraries to be installed. In the second stage the model binary is copied into a new image, which could result in the binary missing specific libraries. In the case of the ED2 model the following was used to find the libraries that are needed to be installed (libgfortran5 and libopenmpi3).
The first step is to build the model using the Dockerfile (in this case the ap-get install was missing in the second stage).
Step 5/9 : RUN git clone https://github.com/EDmodel/ED2.git     && cd ED2/ED/build     && curl -o make/include.mk.VM http://isda.ncsa.illinois.edu/~kooper/EBI/include.mk.opt.`uname -s`     && if [ "${MODEL_VERSION}" != "git" ]; then git checkout ${MODEL_VERSION}; fi     && ./install.sh -g -p VM
... LOTS OF OUTPUT ...
make[1]: Leaving directory '/src/ED2/ED/build/bin-opt-E'
Installation Complete.
Removing intermediate container a53eba9a8fc1
 ---> 7f23c6302130
Step 6/9 : FROM pecan/executor:latest
 ---> f19d81b739f5
... MORE OUTPUT ...
Step 9/9 : COPY --from=model-binary /src/ED2/ED/build/ed_2.1-opt /usr/local/bin/ed2.${MODEL_VERSION}
 ---> 07ac841be457
Successfully built 07ac841be457
Successfully tagged pecan/pecan-ed2:latest
At this point we have created a docker image with the binary and all PEcAn code that is needed to run the model. Some models (especially those build as native code) might be missing additional packages that need to be installed in the docker image. To see if all libraries are installed for the binary.
> docker run -ti --rm pecan/pecan-ed2 /bin/bash
root@8a95ee8b6b47:/work# ldd /usr/local/bin/ed2.git  | grep "not found"
    libmpi_usempif08.so.40 => not found
    libmpi_usempi_ignore_tkr.so.40 => not found
    libmpi_mpifh.so.40 => not found
    libmpi.so.40 => not found
    libgfortran.so.5 => not found
Start the build container again (this is the number before the line FROM pecan/executor:latest, 7f23c6302130 in the example), and find the missing libraries listed above (for example libmpi_usempif08.so.40):
> docker run --rm -ti 7f23c6302130
root@e716c63c031f:/src# dpkg -S libmpi_usempif08.so.40
libopenmpi3:amd64: /usr/lib/x86_64-linux-gnu/openmpi/lib/libmpi_usempif08.so.40.10.1
libopenmpi3:amd64: /usr/lib/x86_64-linux-gnu/libmpi_usempif08.so.40.10.1
libopenmpi3:amd64: /usr/lib/x86_64-linux-gnu/libmpi_usempif08.so.40
This shows the pages is libopenmpi3 that needs to be installed, do this for all missing packages, modify the Dockerfile and rebuild. Next time you run the ldd command there should be no more packages being listed.
33.5 Building and modifying images
For general use, it is sufficient to use the pre-built PEcAn images hosted on Docker Hub (see Docker quickstart). However, there are cases where it makes sense to re-build the Docker images locally. The following is a list of PEcAn-specific images and reasons why you would want to rebuild them locally:
pecan/depends– Rebuild if:- You modify the
docker/base/Dockerfile.depends - You introduce new system dependencies (i.e. things that need to be installed with
apt-get) - You introduce new R package dependencies, and you want those R package installations to be cached during future builds. For packages with fast build times, it may be fine to let them be installed as part of PEcAn’s standard build process (i.e.
make).
- You modify the
pecan/base– Rebuild if:- You built a new version of
pecan/depends(on whichpecan/basedepends) - You modify the
docker/base/Dockerfile.base - You made changes to the PEcAn R package source code, the Makefile, or
web/workflow.R.- NOTE that changes to the web interface code affect
pecan/web, notpecan/base
- NOTE that changes to the web interface code affect
- You built a new version of
pecan/executor– Rebuild if:- You built a new version of
pecan/base(on whichpecan/executordepends) and/or,pecan/depends(on whichpecan/basedepends) - You modified the
docker/base/Dockerfile.executor - You modified the RabbitMQ Python scripts (e.g.
docker/receiver.py,docker/sender.py)
- You built a new version of
pecan/web– Rebuild if you modified any of the following:docker/base/Dockerfile.web- The PHP/HTML/JavaScript code for the PEcAn web interface in
web/(exceptweb/workflow.R– that goes inpecan/base) docker/config.docker.php(theconfig.phpfile for Docker web instances)documentation/index_vm.html(the documentation HTML website)- NOTE: Because changes to this code are applied instantly (i.e. do not require compilation or installation), a more effective way to do local development may be to mount the
web/or other relevant folders as a volume onto thepecan/webcontainer.
The easiest way to quickly re-build all of the images is using the docker.sh script in the PEcAn source code root directory.
This script will build all of the docker images locally on your machine, and tag them as latest.
This will not build the pecan/depends image by default because that takes considerably longer.
However, you can force the script to build pecan/depends as well by setting the DEPEND environment variable to 1 (i.e. DEPEND=1 ./docker.sh).
The following instructions provide details on how to build each image individually.
To build an image locally, use the docker build command as described below.
For more details, see docker build --help or the online Docker build documentation.
First, in a terminal window, navigate (cd) into the PEcAn source code root directory.
From there, the general syntax for building an image looks like the following:
docker build -t pecan/<image name>:<image version> -f docker/base/Dockerfile.<image name> .For instance, to build a local version of the pecan/depends:latest image, you would run:
docker build -t pecan/depends:latest -f docker/base/Dockerfile.depends .The breakdown of this command is as follows:
docker build– This is the core command. The standard syntax isdocker build [OPTIONS] <PATH>, where<PATH>refers to the directory to be used as the “build context”. The “build context” is the working directory assumed by the Dockerfiles. In PEcAn, this is always the PEcAn source code root directory, which allows Dockerfiles to use instructions such asCOPY web/workflow.R /work/. In this example, the<PATH>is set to the current working directory, i.e..because we are already in the PEcAn root directory. If you were located in a different directory, you would have to provide a path to the PEcAn source code root directory. Also, by default,docker buildwill look for a Dockerfile located at<PATH>/Dockerfile, but this is modified by the-foption described below.-t pecan/depends:latest– The-t/--tagoption specifies how the image will be labeled. By default, Docker only defines unique image IDs, which are hexidecimal strings that are unintuitive and hard to remember. Tags are useful for referring to specific images in a human-readable way. Note that the same unique image can have multiple tags associated with it, so it is possible for, e.g.pecan/depends:latest,pecan/depends:custom, and evenmypecan/somethingelse:20.0to refer to the same exact image. To see a table of all local images, including their tags and IDs, rundocker image ls.- NOTE: PEcAn’s
docker-compose.ymlcan be configured via thePECANenvironment variable to point at different versions of PEcAn images. By default, it points to the:latestversions of all images. However, if you wanted to, for instance, build:localimages corresponding to your local source code and then run that version of PEcAn, you would run:
PECAN=local docker-compose -p pecan up -dThis is an effective way to do local development and testing of different PEcAn versions, as described below.
- NOTE: PEcAn’s
-f docker/base/Dockerfile.depends– The-f/--filetag is used to provide an alternative location and file name for the Dockerfile. The convention in PEcAn is to put Dockerfiles for core PEcAn functionality indocker/base/and for specific models indocker/models/, and to name these filesDockerfile.<image name>.
33.5.1 Local development and testing with Docker
The following is an example of one possible workflow for developing and testing PEcAn using local Docker images.
The basic idea is to mount a local version of the PEcAn source code onto a running pecan/executor image, and then send a special “rebuild” RabbitMQ message to the container to trigger the rebuild whenever you make changes.
NOTE: All commands assume you are working from the PEcAn source code root directory.
In the PEcAn source code directory, create a
docker-compose.override.ymlfile with the following contents.:version: "3" services: executor: volumes: - .:/pecanThis will mount the current directory
.to the/pecandirectory in theexecutorcontainer. The specialdocker-compose.override.ymlfile is read automatically bydocker-composeand overrides or extends any instructions set in the originaldocker-compose.ymlfile. It provides a convenient way to host server-specific configurations without having to modify the project-wide (and version-controlled) default configuration. For more details, see the Docker Compose documentation.Update your PEcAn Docker stack with
docker-compose up -d. If the stack is already running, this should only restart yourexecutorinstance while leaving the remaining containers running.To update to the latest local code, run
./scripts/docker_rebuild.sh. Under the hood, this usescurlto post a RabbitMQ message to a running Docker instance. By default, the scripts assumes that username and password are bothguestand that the RabbitMQ URL ishttp://localhost:8000/rabbitmq. All of these can be customized by setting the environment variablesRABBITMQ_USER,RABBITMQ_PASSWORD, andRABBITMQ_URL, respectively (or running the script prefixed with those variables, e.g.RABBITMQ_USER=carya RABBITMQ_PASSWORD=illinois ./scripts/docker_rebuild.sh). This step can be repeated whenever you want to trigger a rebuild of the local code.
NOTE: The updates with this workflow are specific to the running container session; restarting the executor container will revert to the previous versions of the installed packages.
To make persistent changes, you should re-build the pecan/base and pecan/executor containers against the current version of the source code.
NOTE: The mounted PEcAn source code directory includes everything in your local source directory, including installation artifacts used by make.
This can lead to two common issues:
- Any previous make cache files (stuff in the .install, .docs, etc. directories) persist across container instances, even though the installed packages may not. To ensure a complete build, it’s a good idea to run make clean on the host machine to remove these artifacts.
- Similarly, any installation artifacts from local builds will be carried over to the build. In particular, be wary of packages with compiled code, such as modules/rtm (PEcAnRTM) – the compiled .o, .so, .mod, etc. files from compilation of such packages will carry over into the build, which can cause conflicts if the package was also built locally.
The docker-compose.override.yml is useful for some other local modifications.
For instance, the following adds a custom ED2 “develop” model container.
services:
  # ...
  ed2devel:
    image: pecan/model-ed2-develop:latest
    build:
      context: ../ED2  # Or wherever ED2 source code is found
    networks:
      - pecan
    depends_on:
      - rabbitmq
    volumes:
      - pecan:/data
    restart: unless-stopped
Similarly, this snippet modifies the pecan network to use a custom IP subnet mask.
This is required on the PNNL cluster because its servers’ IP addresses often clash with Docker’s default IP mask.
networks:
  pecan:
    ipam:
      config:
        - subnet: 10.17.1.0/24
33.5.2 Troubleshooting Docker
33.5.2.1 “Package not available” while building images
PROBLEM: Packages fail to install while building pecan/depends and/or pecan/base with an error like the following:
Installing package into ‘/usr/local/lib/R/site-library’
(as ‘lib’ is unspecified)
Warning: unable to access index for repository https://mran.microsoft.com/snapshot/2018-09-01/src/contrib:
 cannot open URL 'https://mran.microsoft.com/snapshot/2018-09-01/src/contrib/PACKAGES'
Warning message:
package ‘<PACKAGE>’ is not available (for R version 3.5.1)CAUSE: This can sometimes happen if there are problems with Microsoft’s CRAN snapshots, which are the default repository for the rocker/tidyverse containers.
See GitHub issues rocker-org/rocker-versioned#102 and #58.
SOLUTION: Add the following line to the depends and/or base Dockerfiles before (i.e. above) any commands that install R packages (e.g. Rscript -e "install.packages(...)"):
RUN echo "options(repos = c(CRAN = 'https://cran.rstudio.org'))" >> /usr/local/lib/R/etc/Rprofile.siteThis will set the default repository to the more reliable (albeit, more up-to-date; beware of breaking package changes!) RStudio CRAN mirror. Then, build the image as usual.
33.6 Migrating PEcAn from VM to Docker
This document assumes you have read through the Introduction to Docker as well as Docker quickstart and have docker running on the VM.
This document will slowly replace each of the components with the appropriate docker images. At then end of this document you should be able to use the docker-compose command to bring up the full docker stack as if you had started with this origianally.
33.6.1 Running BETY as a docker container
This will replace the BETY application running on the machine with a docker image. This will assume you still have the database running on the local machine and the only thing we replace is the BETY application.
If you are running systemd (Ubuntu 16.04 or Centos 7) you can copy the following file to /etc/systemd/system/bety.service (replace LOCAL_SERVER=99 with your actual server). If you have postgres running on another server replace 127.0.0.1 with the actual ip address of the postgres server.
[Unit]
Description=BETY container
After=docker.service

[Service]
Restart=always
ExecStart=/usr/bin/docker run -t --rm --name bety --add-host=postgres:127.0.0.1 --network=host --env RAILS_RELATIVE_URL_ROOT=/bety --env LOCAL_SERVER=99 pecan/bety
ExecStop=/usr/bin/docker stop -t 2 bety

[Install]
WantedBy=local.target
At this point we can enable the bety service (this only needs to be done once). First we need to tell systemd a new service is available using systemctl daemon-reload. Next we enable the BETY service so it will restart automatically when the machine reboots, using systemctl enable bety. Finally we can start the BETY service using systemctl start bety. At this point BETY is running as a docker container on port 8000. You can see the log messages using journalctl -u bety.
Next we need to modify apache configuration files. The file /etc/apache2/conf-enabled/bety.conf will be replaced with the following content:
ProxyPass                /bety/ http://localhost:8000/bety/
ProxyPassReverse         /bety/ http://localhost:8000/bety/
RedirectMatch permanent ^/bety$ /bety/
Once this modified we can restart apache using systemctl restart apache2. At this point BETY is running in a container and is accessable trough the webserver at http://server/bety/.
To upgrade to a new version of BETY you can now use the docker commands. You can use the following commands to stop BETY, pull the latest image down, migrate the database (you made a backup correct?) and start BETY again.
systemctl stop bety
docker pull pecan/bety:latest
docker run -ti --rm --add-host=postgres:127.0.0.1 --network=host --env LOCAL_SERVER=99 pecan/bety migrate
systemctl start bety
Once you are satisfied with the migration of BETY you can remove the bety folder as well as any ruby binaries you have installed.
33.6.2 Using the PEcAn download.file() function
download.file(url, destination_file, method)
This custom PEcAn function works together with the base R function download.file (https://stat.ethz.ch/R-manual/R-devel/library/utils/html/download.file.html). However, it provides expanded functionality to generalize the use for a broad range of environments. This is because some computing environments are behind a firewall or proxy, including FTP firewalls. This may require the use of a custom FTP program and/or initial proxy server authentication to retrieve the files needed by PEcAn (e.g. meteorology drivers, other inputs) to run certain model simulations or tools. For example, the Brookhaven National Laboratory (BNL) requires an initial connection to a FTP proxy before downloading files via FTP protocol. As a result, the computers running PEcAn behind the BNL firewall (e.g. https://modex.bnl.gov) use the ncftp cleint (http://www.ncftp.com/) to download files for PEcAn because the base options with R::base download.file() such as curl, libcurl which don’t have the functionality to provide credentials for a proxy or even those such as wget which do but don’t easily allow for connecting through a proxy server before downloading files. The current option for use in these instances is ncftp, specifically ncftpget
Examples:
HTTP
download.file("http://lib.stat.cmu.edu/datasets/csb/ch11b.txt","~/test.download.txt") FTP
download.file("ftp://ftp.cdc.noaa.gov/Datasets/NARR/monolevel/pres.sfc.2000.nc", "~/pres.sfc.2000.nc")customizing to use ncftp when running behind an FTP firewall (requires ncftp to be installed and availible)
download.file("ftp://ftp.cdc.noaa.gov/Datasets/NARR/monolevel/pres.sfc.2000.nc", "~/pres.sfc.2000.nc", method=""ncftpget")On modex.bnl.gov, the ncftp firewall configuration file (e.g. ~/.ncftp/firewall) is configured as: firewall-type=1 firewall-host=ftpgateway.sec.bnl.local firewall-port=21
which then allows for direct connection through the firewall using a command like:
ncftpget ftp://ftp.unidata.ucar.edu/pub/netcdf/netcdf-fortran-4.4.4.tar.gzTo allow the use of ncftpget from within the download.file() function you need to set your R profile download.ftp.method option in your options list. To see your current R options run options() from R cmd, which should look something like this:
> options()
$add.smooth
[1] TRUE

$bitmapType
[1] "cairo"

$browser
[1] "/usr/bin/xdg-open"

$browserNLdisabled
[1] FALSE

$CBoundsCheck
[1] FALSE

$check.bounds
[1] FALSE

$citation.bibtex.max
[1] 1

$continue
[1] "+ "

$contrasts
        unordered           ordered
"contr.treatment"      "contr.poly"
In order to set your download.ftp.method option you need to add a line such as
# set default FTP
options(download.ftp.method = "ncftpget")
In your ~/.Rprofile. On modex at BNL we have set the global option in /usr/lib64/R/etc/Rprofile.site.
Once this is done you should be able to see the option set using this command in R:
> options("download.ftp.method")
$download.ftp.method
[1] "ncftpget"